|
This post contains affiliate links. I will be compensated for purchases made through those links at no additional cost to you. All views expressed are my own. Thanks for your support!
Sometimes, when I think about that fact that my mom made us a home cooked meal for dinner almost every night of my childhood (and sometimes even now) my mind is blown. Thinking up and making something for dinner every night is the hardest part of adulting, I believe.
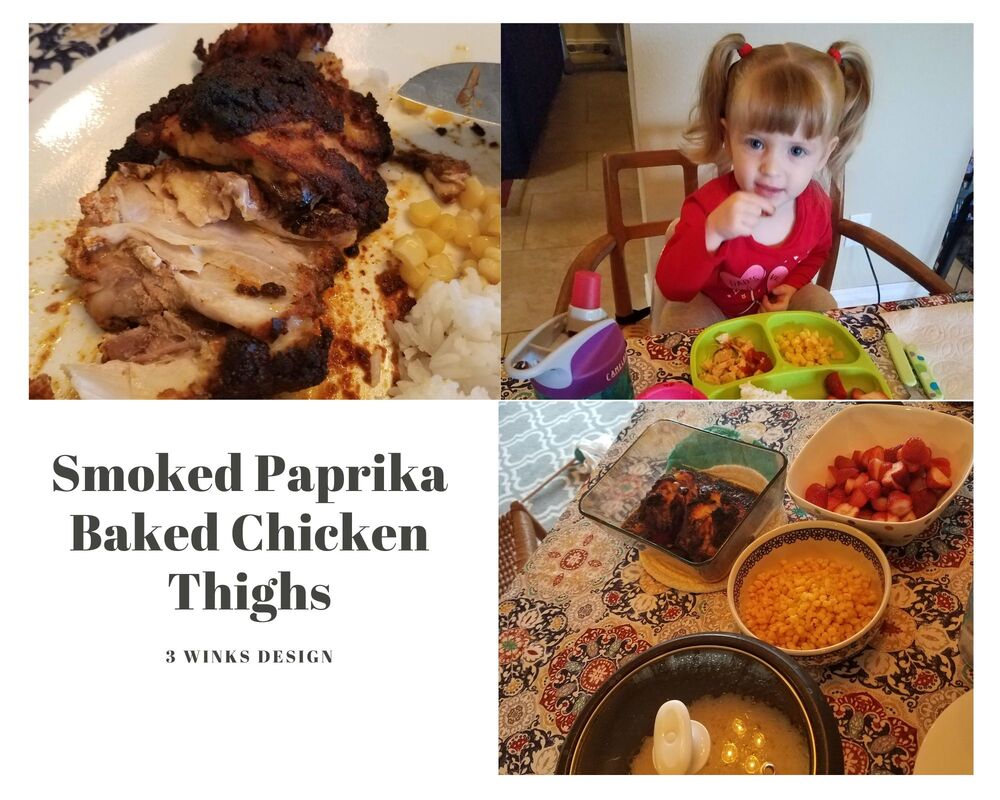
For me, simplicity is the name of the game. That is why I like this recipe for smoked paprika chicken thighs so much. It's simple, requires very few dishes, and the best part? It tastes so yummy! As you can see from my photo collage, I paired my smoked paprika chicken thighs with rice, corn, and strawberries. (Colorful dinner plates are the name of the game guys.) You can mix it up however you like. PH loves chicken and rice and Friday was his birthday, so I thought these smoked paprika chicken thighs would be a great and tasty variation on a theme. I was right. The chicken thighs were moist and flavorful. So, without further ado, here is your recipe for smoked paprika baked chicken thighs so you can have something to make for dinner tonight.
Smoked Paprika Chicken Thighs
This quick and easy dinner is sure to be a big hit with your family Ingredients:1 pound Bone in, skin on chicken thighs 1 ½ TBSP Smoked Paprika 1 TBSP Garlic powder 2 TSP Onion powder 2 TSP Salt 1 ½ TSP Black Pepper 2 TBSP Extra Virgin Olive Oil Directions:Preheat oven to 450 degrees Fahrenheit Mix together all spices and oil in a large sealable bag Add chicken to bag and seal Toss chicken until coated. Use fingers to rub in spice mix to the chicken. Place chicken in a baking dish Bake in the oven covered for 45 minutes and uncovered for an additional 15 minutes until the internal temperature reaches 165 degrees. Remove from oven and serve with a side of rice and your favorite veggies.
0 Comments
This post contains affiliate links. We will be compensated for purchases made through those links at no additional cost to you. All views expressed are our own. Thank you for your support. 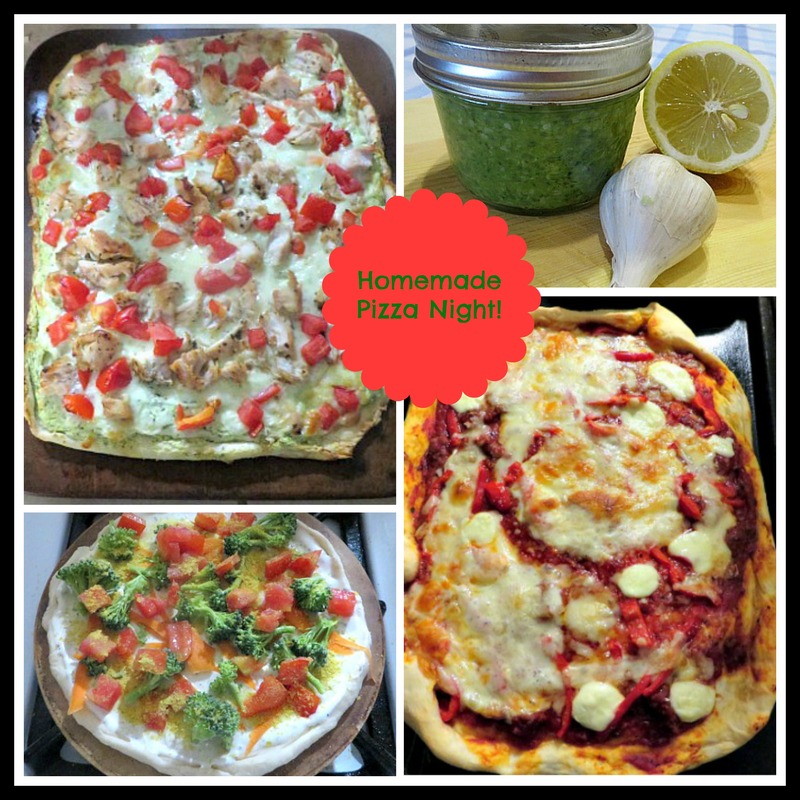
Well, I've been having so much fun on this Fun Friday that the blog is going up a little late, but hey, you can still have fun all weekend long!
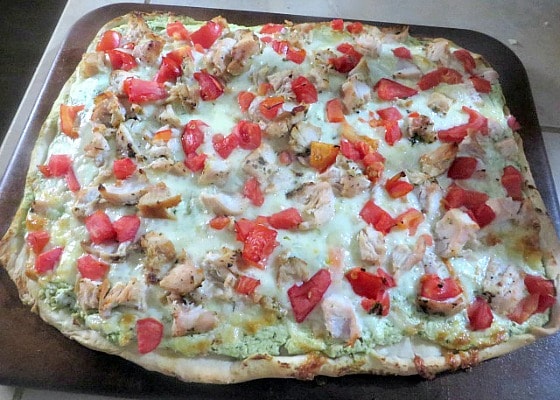
Yesterday I posted about the fresh pesto that I made without pine nuts out of the basil in my garden and I promised you a recipe to use it in. So, today I am showing you a variety of recipes that you can make for a family pizza night, one of which is a Pesto-Goat Cheese Chicken Pizza! That is the great thing about DIY pizza, you can put whatever toppings on them that you want and personalize them to fit your taste. We like to use our favorite pizza dough recipe that I shared on this post long ago. Or, if you are worried about gluten or anything like that, you can make or purchase a cauliflower crust. Lindsey shared a recipe on this post.
Pizza Pans and Stones:
We have a few choices at our house.
Lots of Topping Choices:
I know that some people just hate the idea of pineapple on pizza, but I love a good Canadian Bacon pizza with pineapple on it. Here are some other topping ideas, apart from the normal pepperoni and cheese!
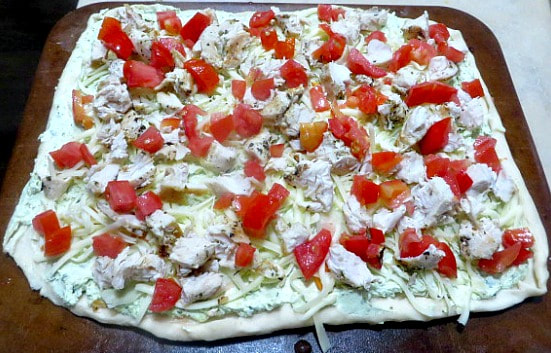
First, I prepared my dough and let it rest and rise while I cooked the chicken and prepared my toppings.
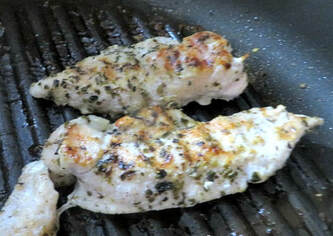
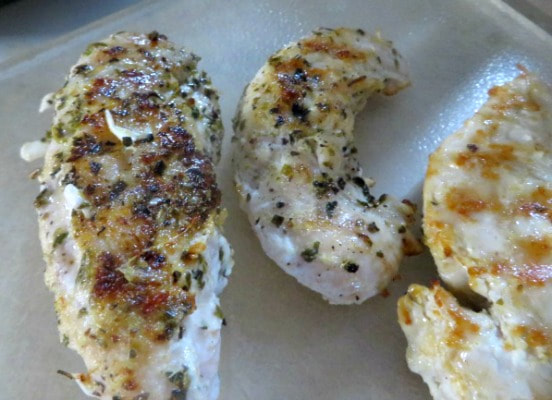
I used my grill pan to prepare the chicken. I used olive oil, salt, pepper, dried oregano, dried basil and garlic to season it. I used chicken tenders that cooked quickly. When they were all cooked, I chopped the chicken into bite-sized pieces.
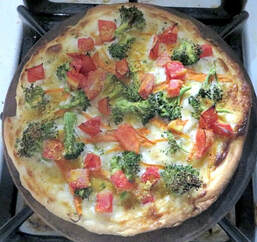
As toppings, I prepared cheese, shredded carrots, broccoli, chopped tomatoes...You get the idea, you can use as many toppings as you would like. For the Chicken-Pesto-Goat Cheese PIzza, I did the following:
prebaked
I also made Maddy a vegan personal pizza.
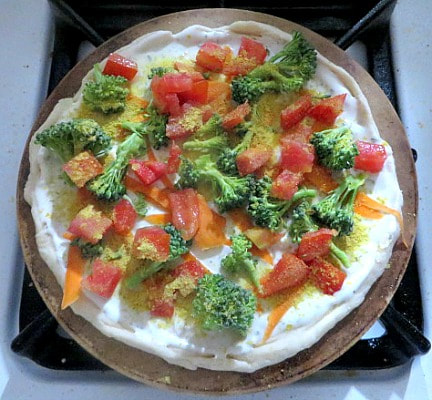
prebaked
If you want to use a traditional red tomato pizza sauce, you can use themarinara recipe I posted here. You can use an immersion blender to make it smooth if you like.
Cooking is more fun for me when I am making things that I grew or created myself. We made the dough from scratch, I made the pesto, I grew the basil and the tomatoes! It all tastes so good! Next, I am going to try making my own mozzarella! What are your favorite pizza toppings? Do you like pineapple on your pizza? I'd love to hear!
This post contains affiliate links. We will be compensated for purchases made through those links at no additional cost to you. All views expressed are our own.
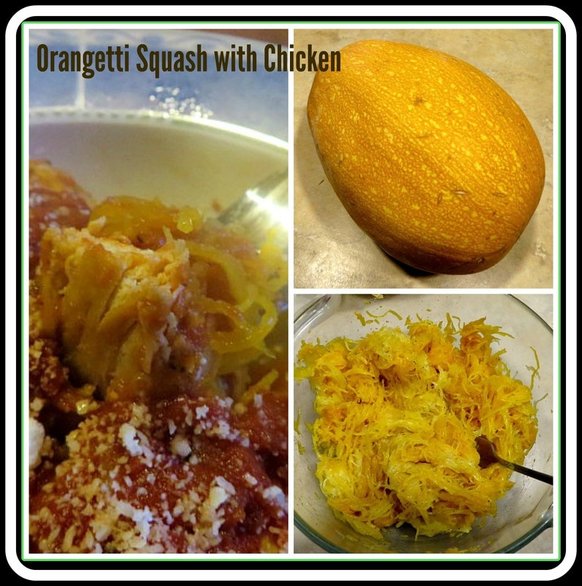
*If you are unfamiliar with spaghetti squash, you will probably be even less familiar with orangetti squash. I got my hands on some a couple of years ago and my family really enjoyed it. I posted this orangetti squash with chicken recipe then and it has become one of our most searched for posts! Since I was able to get a spaghetti squash the other day, it reminded me of this recipe which the spaghetti squash would totally work with. So here is a re-post of how to cook orangetti squash!
A few posts ago, I told you about Market on the Move and how I was able to get a ton of squash, as well as other vegetables for $10. In this post, I gave you a recipe for a Carrot/Squash Loaf using the yellow squash I got a ton of. Another type of squash that I was able to get, I was less familiar with. It is called Orangetti Squash.
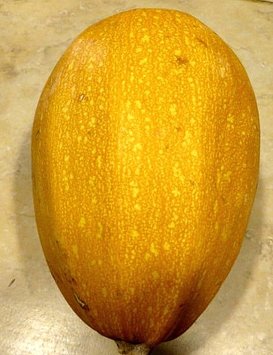
Orangetti is very similar to Spaghetti Squash, only it is smaller, more orange and a little sweeter.
At our house, we have some people who are less keen on beef and would prefer chicken. We have Maddy who is trying to eat a little more vegan. Then, we have my husband and I who just like to eat! In order to accommodate every one, I decided to make a deconstructed Chicken Cacciatore, using the orangetti squash as a replacement for the pasta! Madalynn left out the chicken and simply ate the orangetti with the sauce. Either way, the result was delicious. Here is how I cooked orangetti squash:
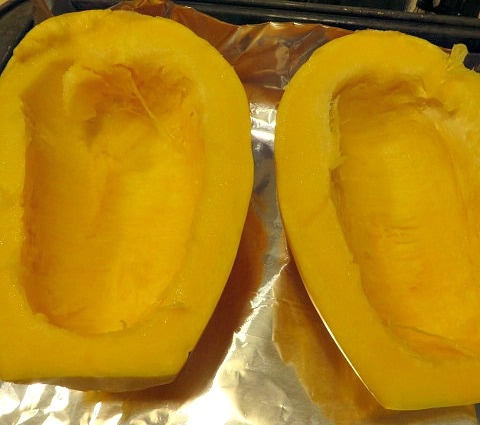
First, I cut open the orangetti and cleaned out the seeds. (Be sure you have a sharp knife because of the tough outer skin.) It smelled like pumpkin and the seeds looked like pumpkin seeds. I was tempted to roast them. I didn't.
I placed the halves of the orangetti squash on a foil lined pan. I drizzled a little olive oil on the squash and sprinkled it with salt and pepper. Then, I put it in a 350 degree F. oven and baked it until tender. (About 45 min. I think, just stab it with a fork to test it.) While it was baking, I started my chicken.
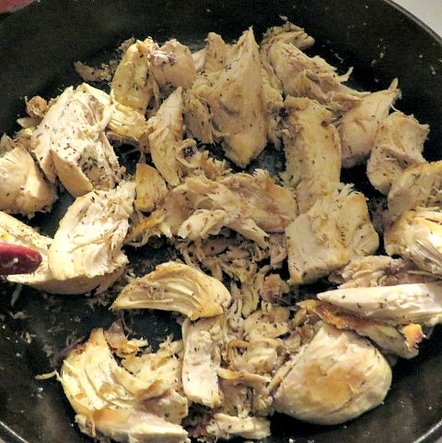
I used chicken breasts on the bone which I first parboiled and then cut off the bone. I cut it into large chunks and browned it in olive oil, adding Italian seasonings, salt and pepper.
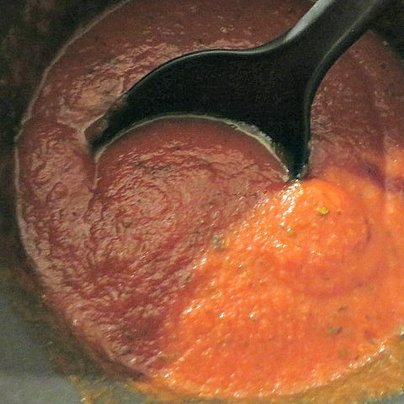
Next, make your favorite marinara sauce, or open a bottle of it and doctor it up to make it taste the way you want. Keep all of these elements separate if you want the deconstructed version of this recipe. Otherwise, you can throw the chicken in with the sauce at this point.
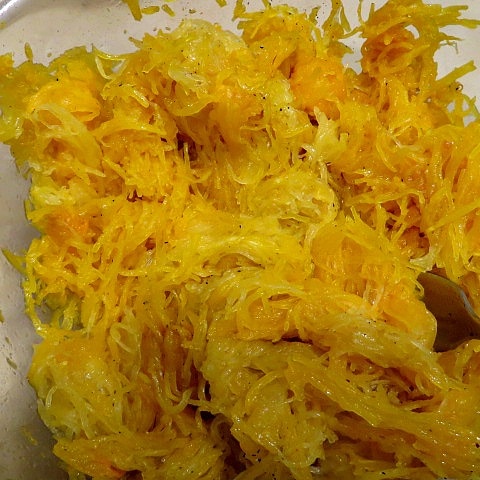
When the orangetti squash is tender, shred it into "spaghetti" with two forks. If you want, drizzle a little more olive oil and add a little more salt and pepper.
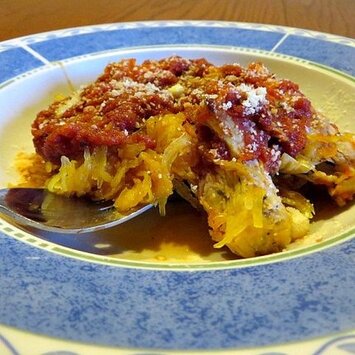
Now you are ready to serve! This is a great one dish meal!
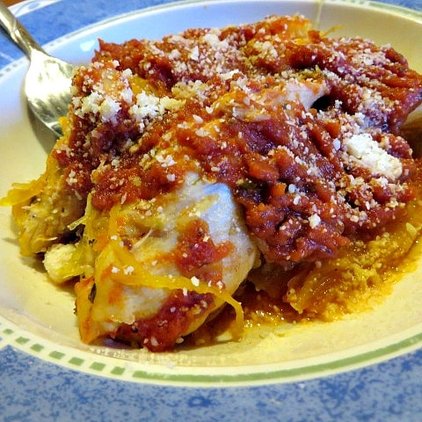
Just put a layer of Orangetti, a layer of chicken, top with sauce and sprinkle on a little grated Parmesan. It is so tasty!
Orangetti Squash vs. Spaghetti Squash
I think I enjoyed the taste of orangetti squash a little more than spaghetti squash. It has a sweet mild flavor that blended so well with the sauce. As I mentioned before, the orangetti squash is also slightly smaller than spaghetti sauce. I ate more for lunch the next day. (When I put it away, I went ahead and mixed it all together!)
If you find Orangetti Squash in the grocery store, don't be afraid to give it a try!
If you need recipe cards, recipe boxes, bowls or cutting boards, or anything, check out Etsy for some cute ideas! Don't forget our Etsy shop where you can find some sweet printables to help your life. 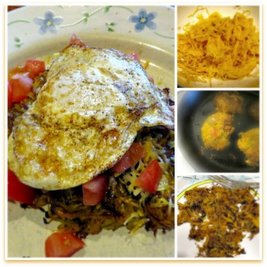
Here is a Southwestern Breakfast Version of Orangetti Squash.
**This post contains affiliate links and I will be compensated if you make a purchase after clicking on my links. But, all opinions expressed are my own.
Happy Halloween! I hope it's an awesome day for all of you.
Today I want to share the last recipe that my family makes often, chicken and waffles! To be honest, I have never had traditional chicken and waffles. One day I would like to try these in the south. But I really love our version, which is really more like a sandwich. I hope you will enjoy them too! You may be wondering why there's no waffles in my picture of chicken and waffles, this is something I will explain later. Chicken and Waffles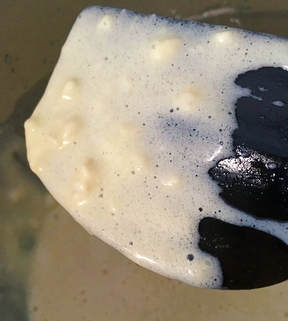 The lumpy batter. The lumpy batter.
This isn't as involved as you might think if you have the right tools. It also isn't the fastest dinner. But it is a satisfying and delicious dinner. And it's something the whole family loves.
The waffles we make are always from scratch and they are so delicious. You can use box mix if you prefer but the recipe we use isn't difficult and is so flavorful. It uses sour milk or buttermilk if you have it. To make sour milk add 1 TBS white vinegar or lemon juice per cup of milk you need. In this recipe you need 2 cups of milk, so I add 2 TBS of vinegar and then fill the remaining volume with milk.This works best because then you won't have too much liquid. Allow the milk to sit for at least 5 minutes. I usually prepare the sour milk very first thing and then get everything out that I need and mix together the dry ingredients. Another tip for the waffles is that you'll want the batter to be slightly lumpy, don't let your batter get too smooth, your waffles will be sad.. If you can put it in the fridge before you make the waffles for at least 20 minutes, it really improves the texture and taste of the waffles. For making the chicken I have these tall food containers with lids that make breading the chicken so easy. In one container I have beaten egg. In another I have a mixture of flour and spices (taste a pinch of the flour mixture to make sure you like the flavor, I've done my best to approximate the amounts of spices but you can adjust according to taste). I put a few pieces of chicken in the egg container first and use a fork to make sure everything is covered with egg. Then I move the pieces to the flour container, out the lid on and shake. I've never had an issue with my chicken not being completely covered this way. It always turns out great, so I highly recommend these containers. They're also great for holding leftovers in the fridge, because they are taller, they utilize the fridge space better than low flat containers. I also recommend a pair of silicone tipped tongs. They make handling the hot chicken so much easier than a fork like I used to use. The chicken comes out so delicious and crispy. The last tool I am loving is my meat thermometer. I used to have an analog one but it broke, so I bought this new digital one and it has made checking the temperature so much easier. This way I don't have to break open my chicken to make sure it's cooked and I don't over cook my chicken. I love it! I did run into some trouble when I was making this the other night. After I made my waffle batter, I plugged in my waffle iron and it didn't work! It never heated up. RIP my waffle maker, you served me well for the last 6 years. Therefore, you will notice a distinct lack of waffles in my pictures. I used my batter to make them into pancakes. It's what circumstances permitted. Waffles are better, but these worked ok. 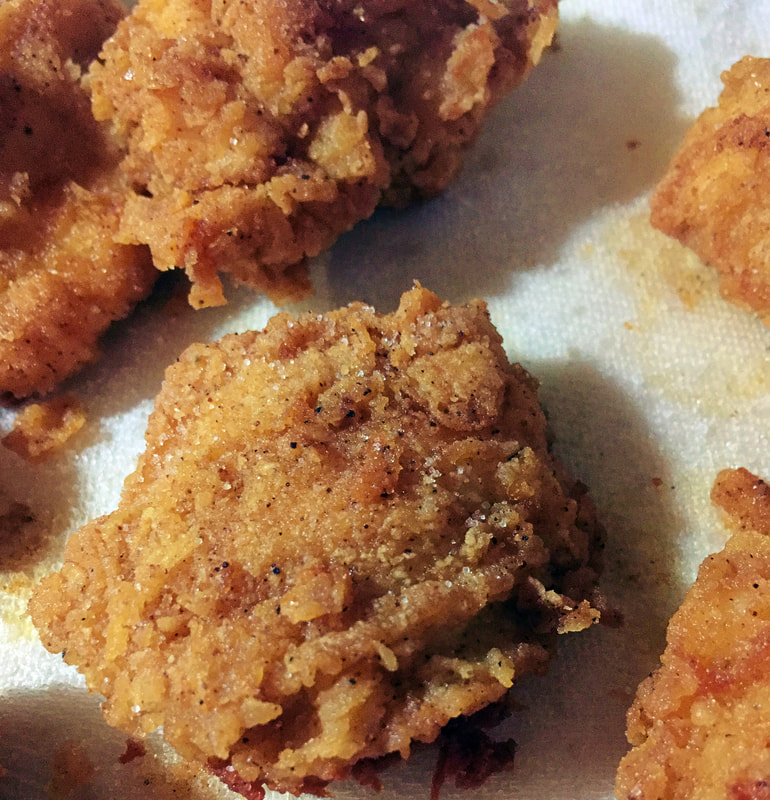
The cooked chicken. So crispy and delicious.
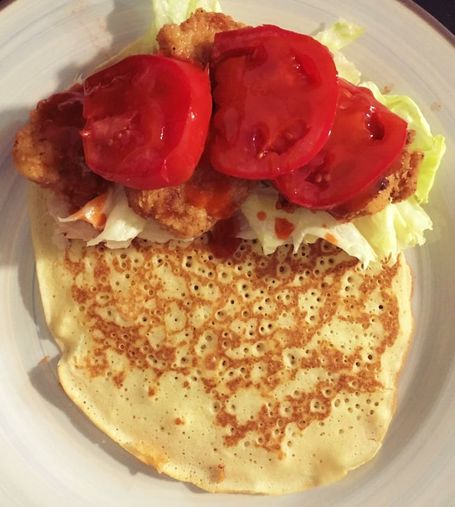
The chicken and waffle pancake
Let me know if you try these out! I love them, I hope you will too!
|
Creators of Hot Cocoa Bombs! (copyrighted)

Author
Helen Reynolds: Mother of six children , grandmother to eleven! I love to cook, craft and create things and I especially love doing that with my family, So, when my lawyer daughter, Lindsey, my artist daughter, Madalynn, and I came up with the idea of Hot Cocoa Bombs, this blog was born. Then, one more daughter, with her technical and science skills, plus creativity has joined in to round us out! Read more about us here! 
Click this link and visit 3WinksDesignShop on Etsy. Find our Hot Cocoa Bomb Idea Book, our For the Love of PIe e-book and more of our creations!

Amazon Gift Cards are the Perfect Gift!
    Archives
April 2024
|
 RSS Feed