|
This post contains affiliate ads. I may be compensated if you purchase through any of our links. Thanks for your support!
The other day when I went to the grocery store I saw that strawberries were on sale, 88 cents a pound! I bought a LOT of strawberries. I love a good strawberry, and it was perfect for the strawberry spinach salad I was going to make for dinner that weekend.
However, I had several pounds of strawberries, and PH and I are only two people. I didn't want them to go bad, and so I was planning on building our food storage with them. I have a lot of fruit and veggies that I've frozen to have on hand when necessary, but this time around, I decided I wanted to try my hand at canning. My mom has talked to you about canning a few times on this blog. I remember growing up all the canning she would do. She'd make different types of jams, and she'd can various fruits and veggies, and even meat! You may remember this post where she told you how to can peaches using a water bath. She also gave you some jam canning tips (including strawberry jam!) here and here. My mom is kind of a canning pro, and since I have never canned anything before in my life, I asked her if she'd come help me make some strawberry jam! She came over, and we decided to do something a little different this time and film the process for you to watch and enjoy! Check out our videos below.
Now I have to step in here and let you know that this is where we had some technical difficulties with our camera and had to switch to a different one. Unfortunately, by the time we realized our camera wasn't filming we had missed a few crucial steps. The main one being that once the jam was boiling after the pectin and butter were added we added the sugar. A few tips from my mom. The recipe calls for A LOT of sugar (seven cups!) You can make a low sugar variety of jam, but you have to use a special pectin or it won't work. Since we had regular pectin, we had to use all the sugar. The second thing about the sugar is, you have to add it all at once. I measured all seven cups into a large bowl and when my mom told me it was time to pour in the sugar then I poured it all in at once.
We kept stirring continuously until the jam came back up to a rolling boil. Then we turned the head off. All while cooking our strawberry jam our jars were sterilizing. We filled the jars up with boiling water, and we put the lids in a bowl and covered them with boiling water as well. That water also helps the lids to soften so they'll be ready to seal once your jars are filled. Once you turn the heat off you'll see some foam in your pot. Mom took a regular spoon to skim that foam off the top. She put it in a separate bowl. There is nothing wrong with the foam, but when it cools it kind of looks like a hardened skin and isn't very pretty inside the jars. So just use a spoon to skim around the top and get all the white foam out. She also saves the bowl because at the end there is always a little extra jam that you can pour into the bowl and you can use it right away. It gets you started on enjoying your jam! Okay, continue onward now that you know the rules about the sugar and the foam!
Making my own jam and canning it was a lot of fun, and actually much easier than I thought! This recipe we used used up three pounds of strawberries. So I actually have three more pounds that I intend to use to make even more jam this weekend! It's exciting to be able to do something that helps build our food storage, and it was a fun little project to do with my mom! So get together and make some strawberry jam!
2 Comments

It is so satisfying to can and see the end result! I love it!
This post contains affiliate links and I will be compensated if you make a purchase after clicking on my links.
Blackberries and strawberries have been alternately on sale the past few weeks, so of course I have been canning them because I love to can and I love blackberries and strawberries! I usually just eat the blackberries, or make them into Blackberry-Lemon Marmalade, or turn them into cake, or Blackberry Lemon Bars. This time I decided to can some to keep on hand.
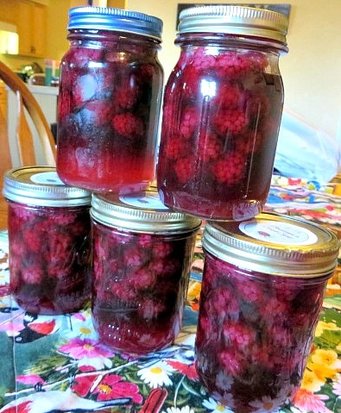
Blackberries!
Canning Blackberries is super easy because there is no peeling or coring. Here is how you do it in a nutshell.
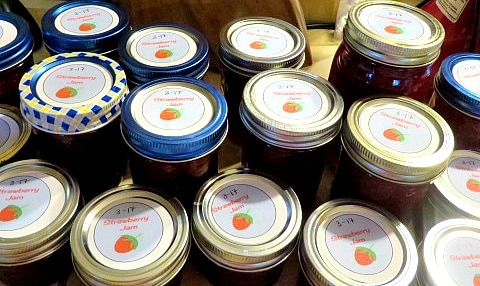
With the strawberries, I made a ton of Strawberry Jam. I gave you jam making tips on this post.
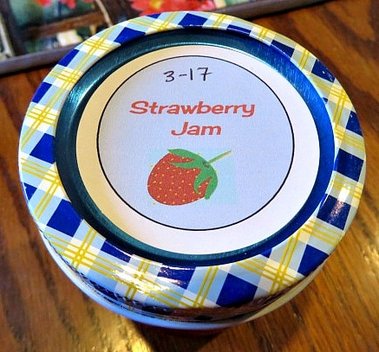
If some of my labels look crooked, it is because I didn't want to waste my trial prints! Yours should be more lined up. (I hope!)
One of the things that I have mentioned before is that instead of putting labels on the jars themselves, I like to put them on the lids that will be discarded anyway. That way you don't have to spend time peeling them off of the jars when the jam is all eaten and you want to use the jar again. I found some printable labels at Dollar Tree! They have round ones in the store, as well as square shipping labels. You can't beat the price on these, for just a dollar! I designed some simple labels to put on my jars and I decided to share them with you! This is a small way for me to say "Thank You!" for all of your support on our blog! This week we achieved over 31,000 views per month and it makes us so happy to think that the things we talk about have value to you.
To print the labels, click on the button to get the pdf file. Then click print. Make sure you click the "fit to page" option. There are some blackberry and many Strawberry Jam labels on one page. You may only need one or the other, but you can always cut them off and save the ones you don't use. These are designed to print on the Polaroid Round Adhesive Labels. You can also find them on Amazon here. jam labels jam labels 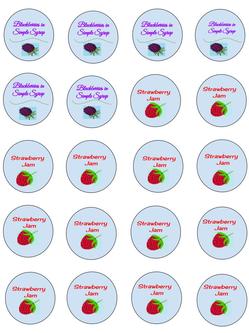
I have a lot of jam canned now! I was using up a lot of styles of rings, lids and jam jars!
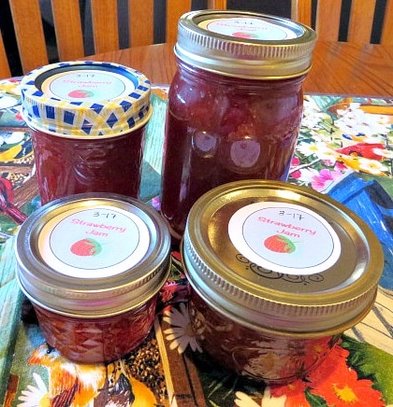
The little ones come in handy to give as quick gifts! It makes it a cuter gift with the label on it.
We have many more fun ideas to write about. I am having so much fun working on this blog with my girls. Thanks for your support. Keep coming back to see what else is in store!
If my labels are too simple, here is a link to some really sweet choices on Etsy! They aren't free, but if you want something a little fancier, there are some really cute things there.
We have had so much going on with our family and extended family in the last month, that my blog has taken a backseat. I ended up making another batch of dipped chocolates, as I demonstrated in my last post, but this time I added the Oreo ones and a peanut butter flavor. Our Easter was great and especially poignant because members of our family have been lost to us recently. We know that because of Jesus Christ's resurrection, we will see them again.
One other thing that I wanted to talk about this week is strawberry jam! I did manage to get a batch of it made when strawberries were a good price. I love making jam. It gives me such a feeling of satisfaction and accomplishment to see my jars sitting there all sealed and ready to go when I am finished. 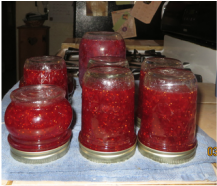
Those are my jars upside down, sealing.
I know that a lot of people already make jam. So I thought that I would just give a few tips that I have learned over the years that I have been making jam. * First of all, I have started chopping up or mashing my fruit in my food processor. I used to cut it up and then mash it with a potato masher. But, the food processor is so much faster. You just have to be careful to pulse it and only do that until it is in nice sized chunks because you want to have bits of fruit in your jam. * Remember that if you want to have jam and not a fruit syrup, you put in the fruit, butter and pectin first and get it all boiling, then add the sugar all at once and bring to a boil again. I have made this mistake so many times, but I finally got it into my braid that this is why over the years we have had ice cream toppings instead of jam on occasion. 
It even has a little place in the lid for a spoon.
* Be sure to wipe the rim of the jar before filling it and use new lids each time. Then, I flip the jars upside down for at least 5 minutes so they will seal, and this also helps disperse the fruit throughout the jar. You can water-bath seal them, but the directions on the pectin say that the flipping method is safe and I have never had any jam go bad on me.
Really, jam keeps for a long time. We try to rotate it by age so we use the older jars first, but we have found some that we have overlooked that that has been a couple of years old, and it was perfectly fine. Sometimes it may discolor a little, but it tastes great! 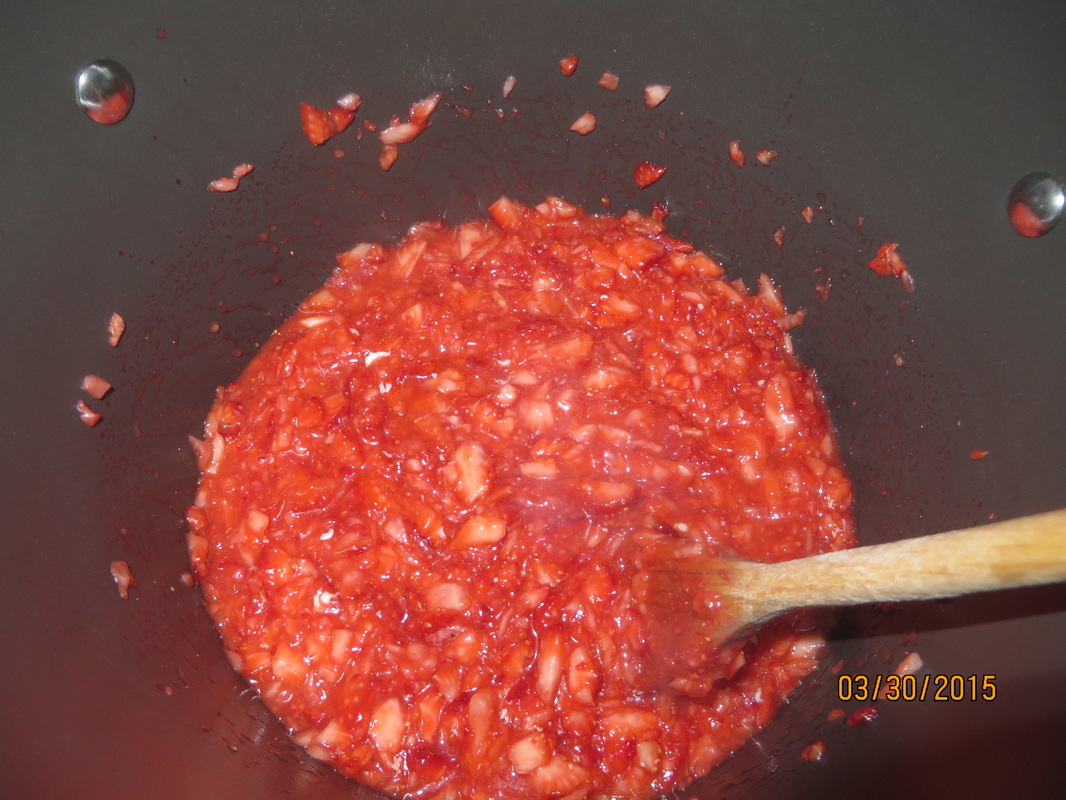
This is how the fruit looks after the food processor and here it is in the pot with the pectin, just starting the process.
* After you add the sugar and boil for the reccomended amount of time, take the time to stir it and skim off the foam before you bottle it. The recipe that I use is the one in the pectin box, and it says to stir and skim for 5 minutes. I always worry that the jam will cool too much to seal if I take that long, but I do stir and skim for a couple of minutes. Then I jar it. The reason this is important is because you want the fruit chunks to be dispersed throughout the jar and not all floating on the top of the jar. The people who will eat the jam will get lots of fruit on top, and then virtually jelly in the lower part of the jar.
When you skim, use a metal spoon and save the foam. I actually put my foam and any leftover jam that won't fill a jar into the crock in the picture above that I bought in Germany from the Waechtersbach Factory in Germany back in the '80's.. Then I put it in the fridge and we eat that jam first!
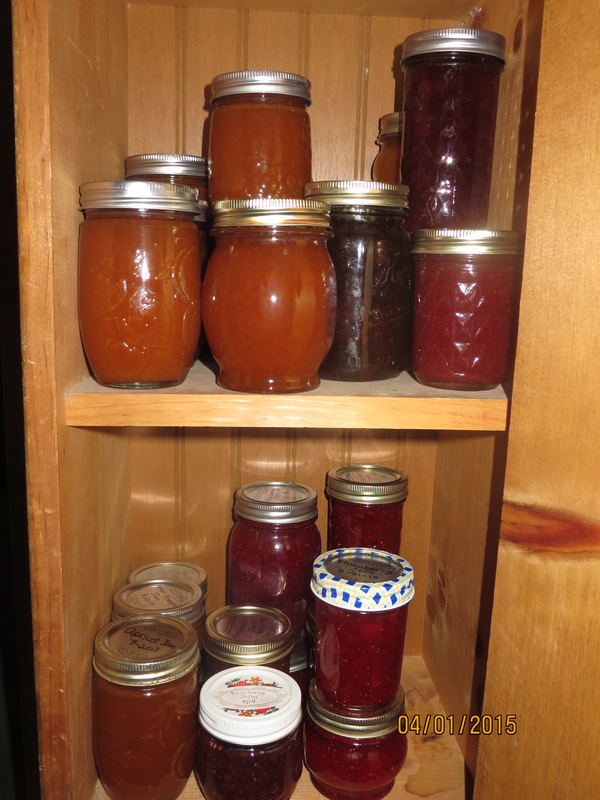
That other picture is my cute little jelly cupboard where we keep our jam. It has been much more full than this in the past, so I need to get busy and fill it up!
Oh! One last tip. I used to put cute lables on the jars, but they were a pain to take off after the jar was empty. (Always save and reuse your jars, they can be expensive.) So, now I use a sharpie and write the kind of jam and the date on the lid, because it will get thrown away anyway. (Do not reuse your lids!) If you really want something cute for giving away jars of jam, get the round kind that can fit on top of the lid. I was going to put a delicious looking picture here of jam on my roll, but I ate it too fast! Hope these tips help! |
Creators of Hot Cocoa Bombs! (copyrighted)

Author
Helen Reynolds: Mother of six children , grandmother to eleven! I love to cook, craft and create things and I especially love doing that with my family, So, when my lawyer daughter, Lindsey, my artist daughter, Madalynn, and I came up with the idea of Hot Cocoa Bombs, this blog was born. Then, one more daughter, with her technical and science skills, plus creativity has joined in to round us out! Read more about us here! 
Click this link and visit 3WinksDesignShop on Etsy. Find our Hot Cocoa Bomb Idea Book, our For the Love of PIe e-book and more of our creations!

Amazon Gift Cards are the Perfect Gift!
    Archives
April 2024
|
 RSS Feed