|
This post contains affiliate links. If you make a purchase after clicking them, we will be compensated, but there is no additional cost to you. All opinions expressed are our own. Thank you for your support.
Around Thanksgiving I made this cute poster print on Mixbook of my babies wearing sunglasses and being insanely happy about it. It was so easy to make the poster and it turned out so cute. I also loved their selection of backgrounds and layouts. It was really easy to use their upload tool and making the poster took me no time at all. I was really pleased with the quality when it came in the mail as well. Especially considering both photos were taken with cell phone cameras.
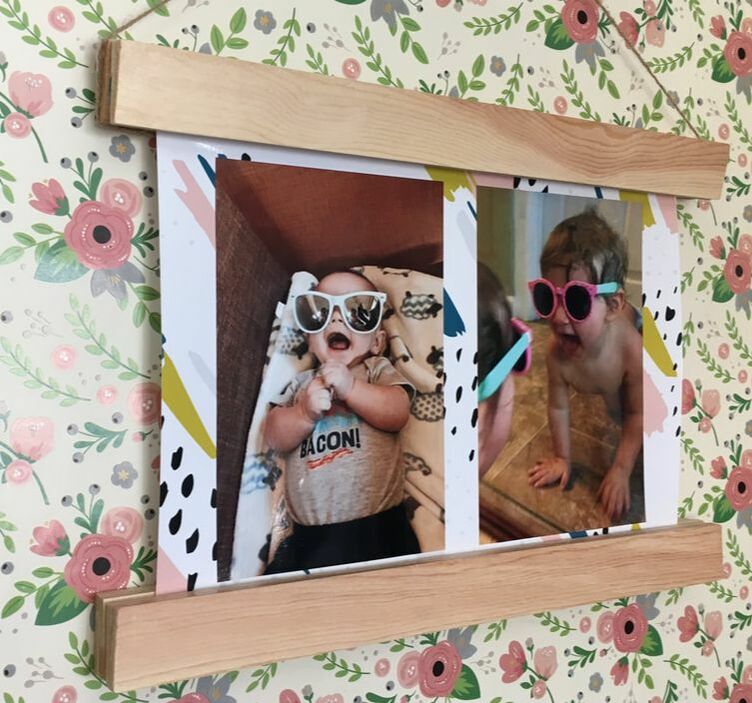
What I wasn't sure of was how to display the poster in my home! That's when I had the idea to make a magnetic poster frame. I have always loved the minimalist look of these simple wooden frames but the price tag on the bigger frames was enough to turn me away. When I saw these paint stirrers for 5 gallon buckets for less than $2 how to make one struck me like lightening. Watch the video below to see how I did it.
I love how customizable these frames are. You can use them to hold a variety of size of prints and posters. And you can paint them, use a wood burner on them, or decorate with Washi tape.
And they're the perfect thing to display my Mixbook poster prints. I can't wait to order more and change them out, because it's so easy to change the picture displayed in these frames! Some tips for making these:
With Mother's Day (and Father's Day after that) coming up this could be an easy and thoughtful gift to give to your mother or grandmother! Especially if you include a photo print, of their favorite people. 
That will be especially easy right now because Mixbook is offeringup to 50% off orders until May 1st. That's tomorrow so get your orders in soon! Also if you are a new customer you can get 45% off with the code AFNEW19. Two incredible deals! If you aren't a new customer there's another code for Mother's Day that works until May 7th. MOMDAY19A will get you 45% off $139 or 40% off Sitewide
Let us know how yours turns out!
8 Comments
This post contains affiliate links. If you make a purchase after clicking them, we will be compensated, but there is no additional cost to you. All opinions expressed are our own. Thank you for your support. 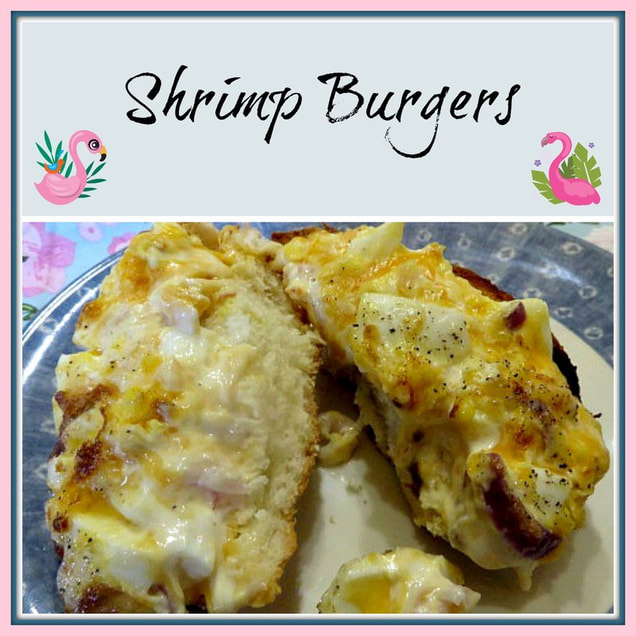 When I was in college 40 years ago, my roommate, Debbie, introduced our apartment of girls to her family's fabulous recipe for Shrimp Burgers! Since I love shrimp (and all seafood) and because it is really a simple and delicious recipe, it was a perfect match for me. Over the years of my married life, I would pull this recipe out every so often. I saw shrimp on sale recently and decided it was time to pull it out again! This time, I changed up the original recipe to be a little more modern, using some amazing brioche rolls from Panera instead of hamburger buns and some chopped red onions instead of green. Also, the original recipe called for canned shrimp and I used frozen salad shrimp. They taste a bit fresher, but less salty, so you should salt and pepper to taste.  These brioche rolls from Panera are super good! You can get them with rapid pick-up or delivery! 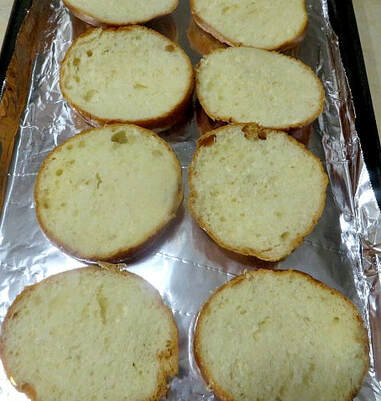 Lay them out on the baking sheet like this and then pile with the shrimp topping. 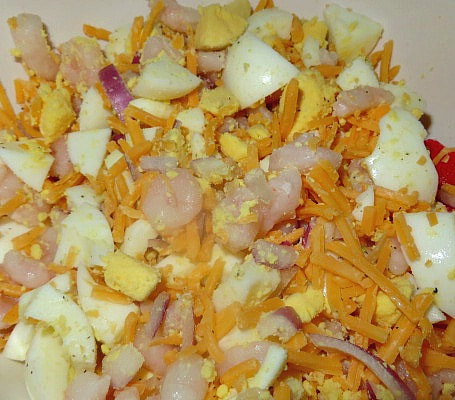 This is the mixture before the Mayo is added. 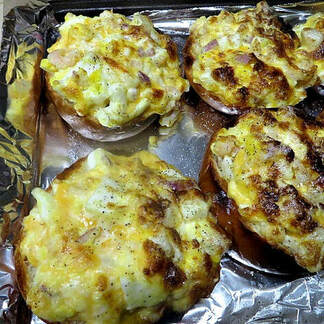 Watch them before they get too brown. These were just about right. 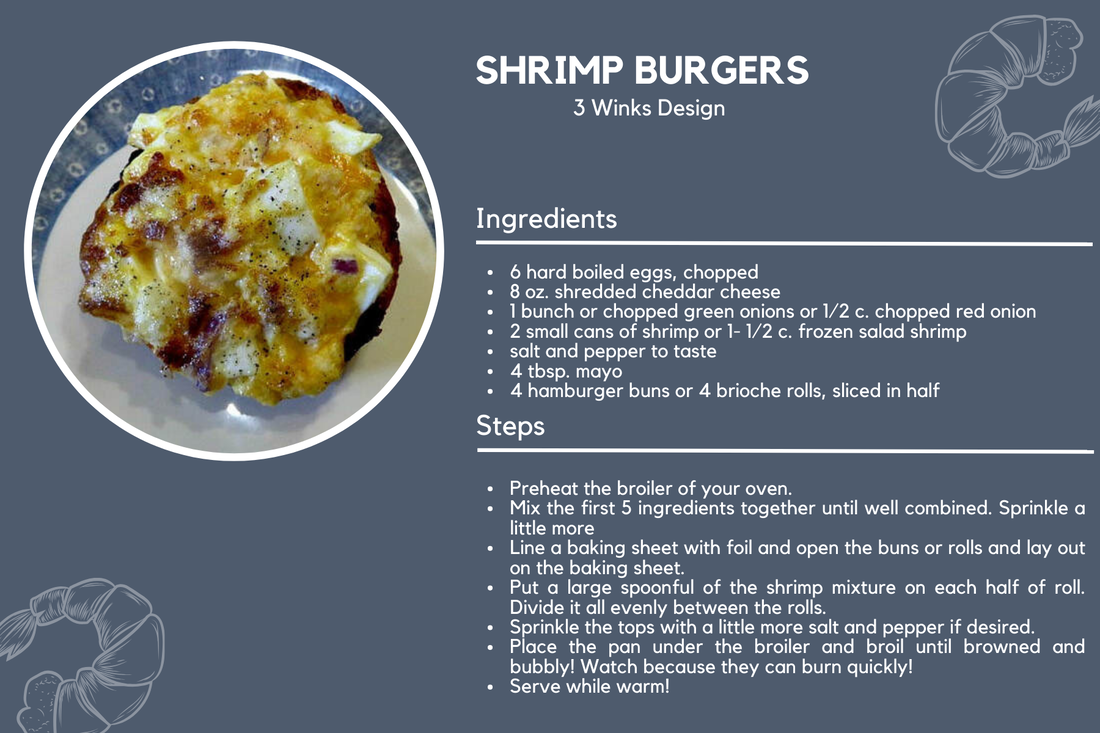  Dig in! Do you have any recipes that you have been making since college? I'd love to hear about them! And, thanks Deb for this recipe and for all of the fun memories that go with it!
This post contains affiliate links. If you make a purchase after clicking them, we will be compensated, but there is no additional cost to you. All opinions expressed are our own. Thank you for your support.

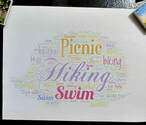
For Friday Faves #99 (Wow!) I asked everyone what they loved to do in the Spring! I took all of their answers and put them in the hedgehog shaped picture above! Now, I can print it off (which I did) and hang it on my fridge and then a multitude of wonderful ideas are at my fingertips! Feel free to download the image and print it for yourself if you would like . It is kind of like a Springtime Bucket List.
With the weather here getting pretty darn warm during the day, swimming is becoming an option already, but the evenings and mornings are still nice for some of the activities like star gazing, an outdoor movie or a campfire with s'mores! See how many ideas you can find on the list! Hopefully our ideas will inspire some ideas of your own! These are all great family ideas that will create lasting memories.
I made the collage of Spring ideas on a site called WordArt. It is such an easy site to use and they have all kinds of shapes to put your collage in. I've done it before with family names and classroom names for kids to keep as a memory of a certain year or activity. You can customize the colors and choose from a variety of shapes. (They even have owls!) I wasn't able to save my file as a pdf, so that is why you have to download the jpeg and save it and copy it that way. Be sure to uncheck the fit to page box when you print.
If you don't have the same interests that we do, or if you want to change or add ideas, you can go to WordArt and create your own collage. I hope that you have fun with it and take advantage of the great weather while it is here! Let me know if you add ideas to the bucket list! Maybe I would like to try some of your ideas!
This post contains affiliate links. I will be compensated for purchases made through those links at no additional cost to you. All views expressed are my own. Thank you for your support.

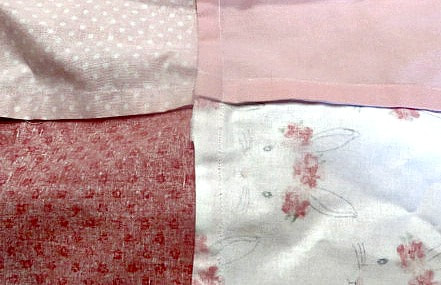
I love those little packs of fat quarters that you can pickup at Walmart for about $1.00. I sometimes find packs of them with such cute prints, that are all coordinated together, and I buy them thinking I will do something with them later. I have used them for quilts here and here, for these bow ties, these little owl purses, and there are a myriad of other ideas out there, I'm sure. Well, I fell for some cute Easter prints earlier this year, but I hadn't figured out what I wanted to do with them. Then, just before Easter, when we had decided to do the brunch, I realized I needed 2 tablecloths with a springtime feel and I thought about that package of fat quarters! It came in a coordinated pack of pinks and blues. I thought, why not sew them together into one big tablecloth! Of course, I was going to need more of the fat quarter packs. Unfortunately, the packs like the one I had purchased were all gone! But, there was some of the exact fabric on the bolt and other coordinating prints!

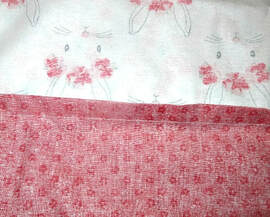
I loves this sweet bunny print! They had it on the bolt!
So, I purchased the fabric from the bolt and cut out my own quarters! It would have been much easier if I had purchased the correct number of quarter packs to begin with, so if you know that you are going to make a tablecloth, buy the right number from the start! For my table, it takes about 4 packs of quarters.
Most of the fabrics in my original pack had the pinks like you see above. One of the prints was a coordinating blue. I have plates that were going to look great on the pink, and others that were going to go well on blue. Since we were putting up 2 tables, and I was going to use both sets of plates, I decided to make one cloth in each color, so I purchased blue prints to go with the original blue bunny print. I placed that print right in the middle of the cloth. 
The bunny with the glasses print is the original fabric.
The tablecloths came together pretty quickly. I played with how I wanted the placement of the various fabrics. I started from the middle of the cloth, then built around that. I sewed the fat quarters together with french seams so that there wouldn't be messy fraying on the back of the cloth. I once showed you how to do french seams on this pillowcase tutorial.
That's all there is too it! My tables looked sweet and they were perfect for our brunch! Unfortunately, I FORGOT TO TAKE PICTURES OF MY TABLES! Trust me, they were sweet.
You can make tablecloths like this for any time of year and for any event! If you don't want to make an entire tablecloth, try a table runner! Have fun picking out those fat quarter! That's the best part.


|
Creators of Hot Cocoa Bombs! (copyrighted)

Author
Helen Reynolds: Mother of six children , grandmother to eleven! I love to cook, craft and create things and I especially love doing that with my family, So, when my lawyer daughter, Lindsey, my artist daughter, Madalynn, and I came up with the idea of Hot Cocoa Bombs, this blog was born. Then, one more daughter, with her technical and science skills, plus creativity has joined in to round us out! Read more about us here! 
Click this link and visit 3WinksDesignShop on Etsy. Find our Hot Cocoa Bomb Idea Book, our For the Love of PIe e-book and more of our creations!

Amazon Gift Cards are the Perfect Gift!
    Archives
July 2024
|
 RSS Feed