|
This post contains affiliate links. If you make a purchase after clicking them, we will be compensated, but there is no additional cost to you. All opinions expressed are our own. Thank you for your support. Hello! Alicia here, back with another recipe from my heritage. This month we are doing Denmark. On my mother's side we are Danish! We have ancestors that moved to America from Denmark in the early 18th century. Some of them fought in the Revolutionary War. (So excuse me while I go join the D.A.R. like a Gilmore Girl). I'm excited to delve into Denmark's cuisine and culture this month and learn more about my ancestors through food. Today I'm sharing a recipe that would be a delicious breakfast but is also commonly eaten at tea time or as a snack; Æbleskiver. 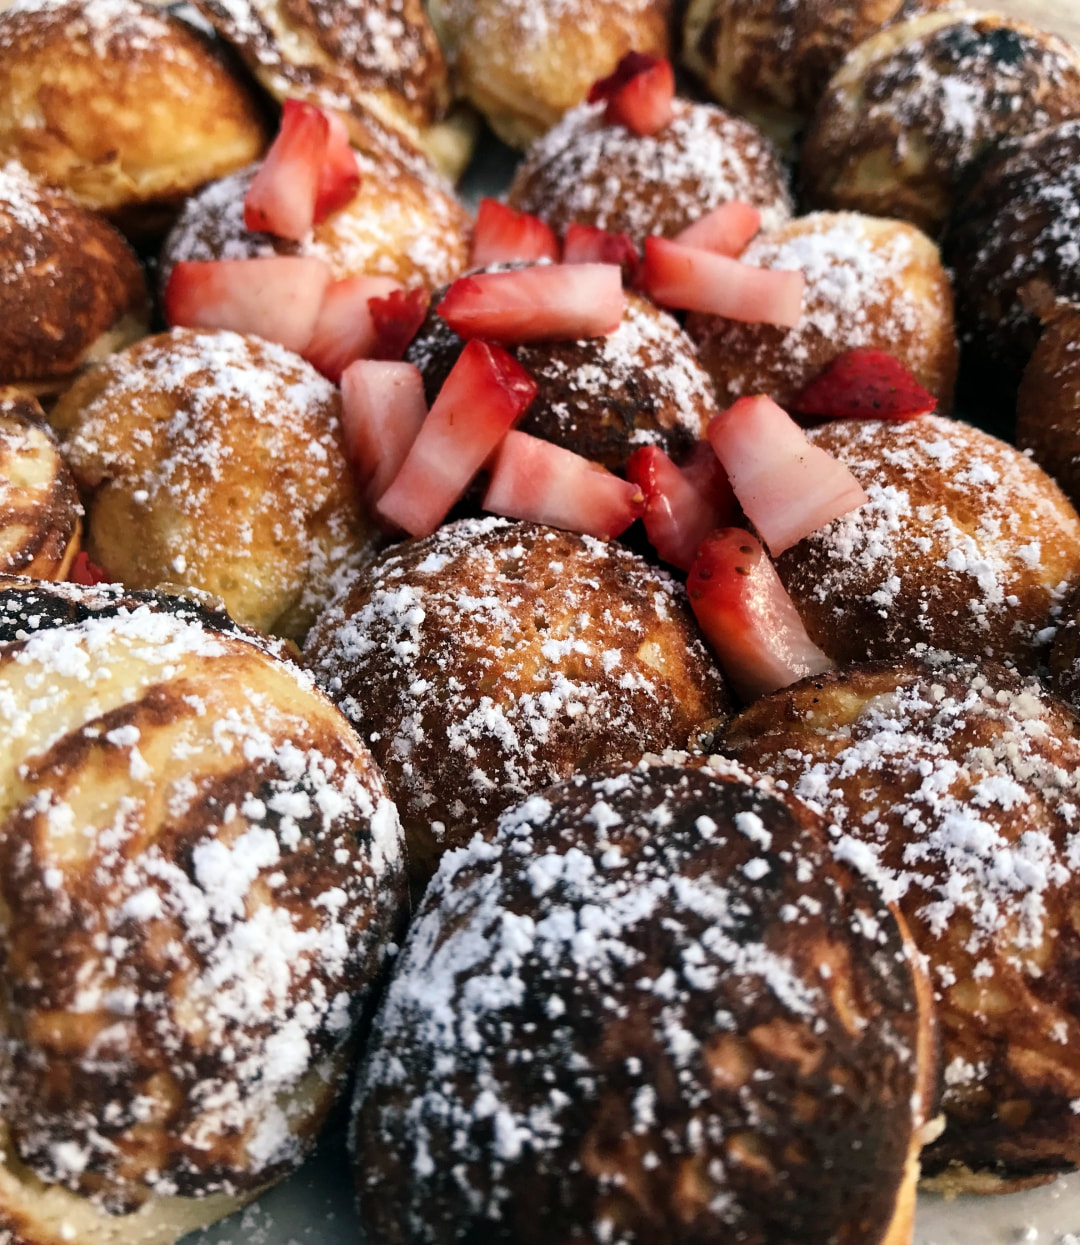 ÆbleskiverÆbleskiver are essentially puffy pancake balls, and they are so delicious. When I asked my friends on Facebook what Danish dishes they liked this was the only response I got back (besides a danish). My friend Katie graciously shared her recipe for them with me. To make them you will need a special æbleskiver pan. I ordered a cast iron pan on Amazon, it came preseasoned and ready to cook with! It worked so well! You will also want some wooden skewers or toothpicks to turn the æbleskiver over. I know it sounds strange, but it's really the easiest way. You can also put filling in them! I used strawberries, bacon, dulce de leche, and chocolate chips. All the fillings were good, but the strawberry was my favorite. To put the filling in, I poured my batter into the pan and then just pushed the filling in until it was covered with batter. That was easiest for me but you could also do it where you put a little batter, then filling, then more batter. Find a way that works for you. Top them with powdered sugar and buttermilk syrup and you've got a perfect treat! 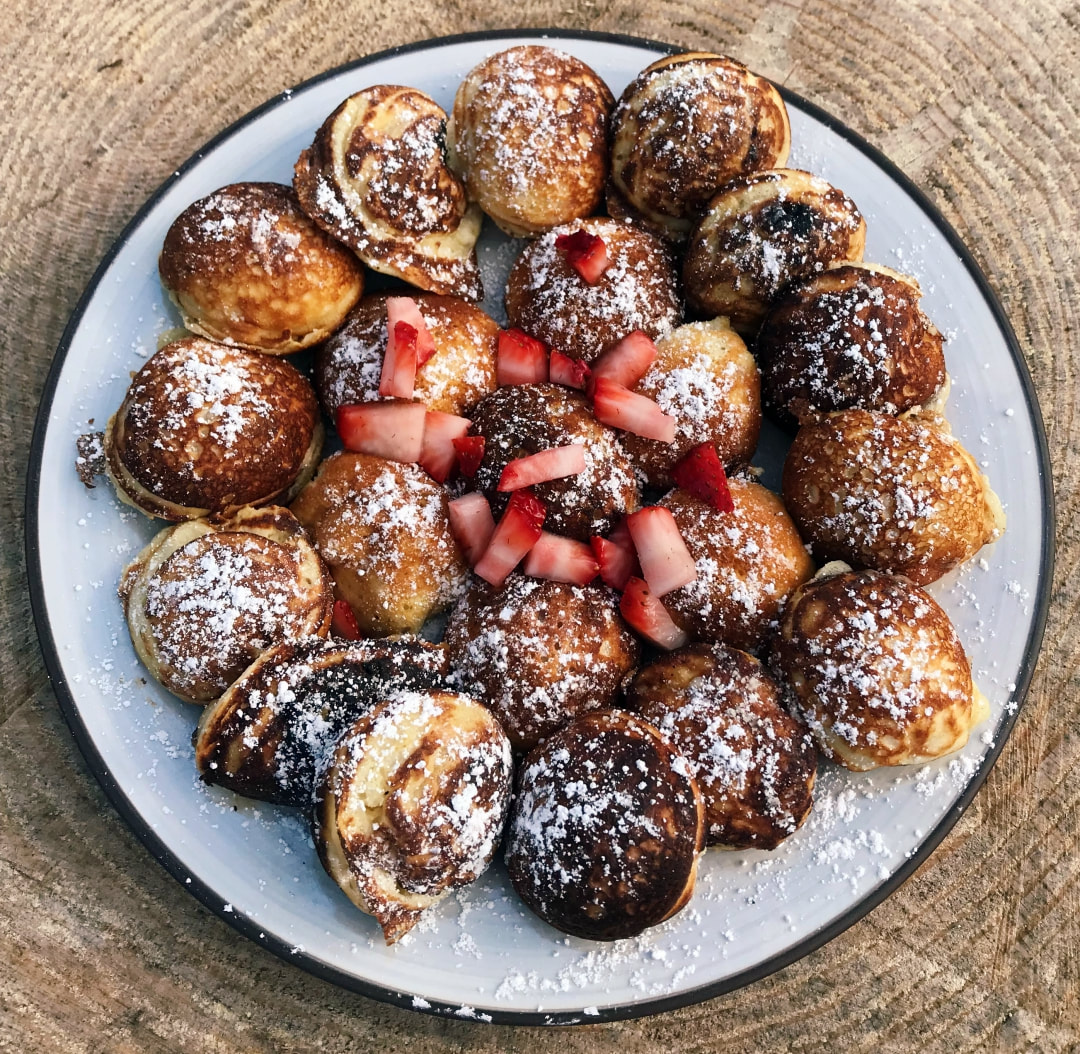 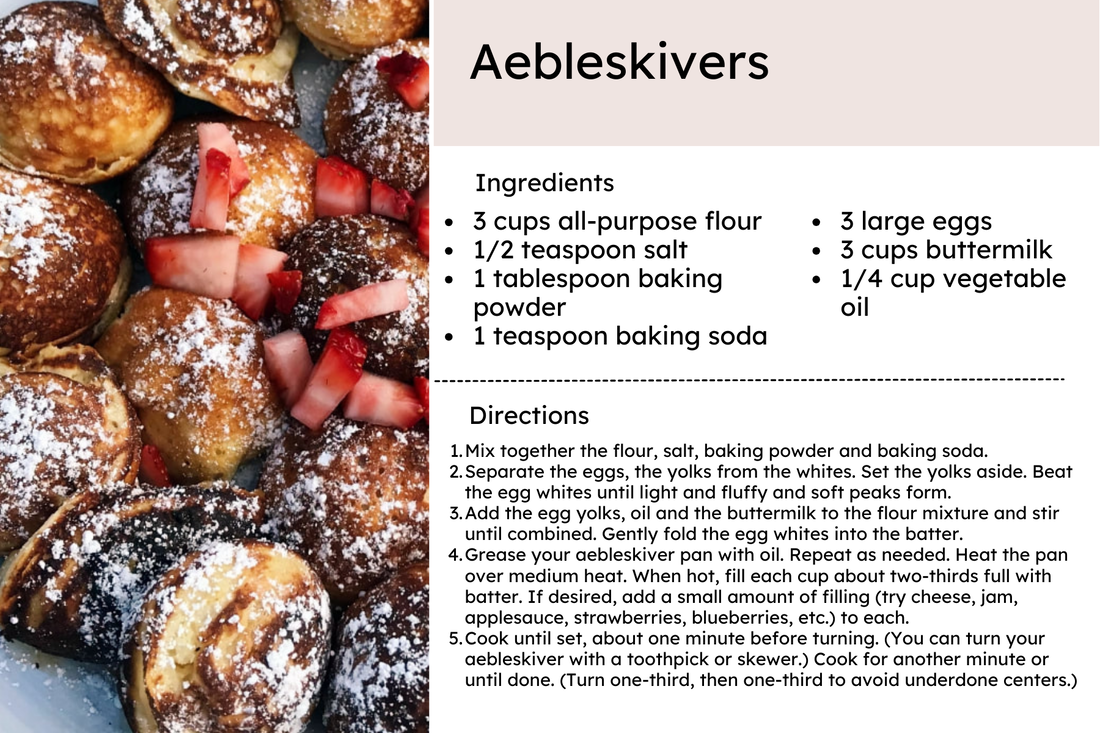 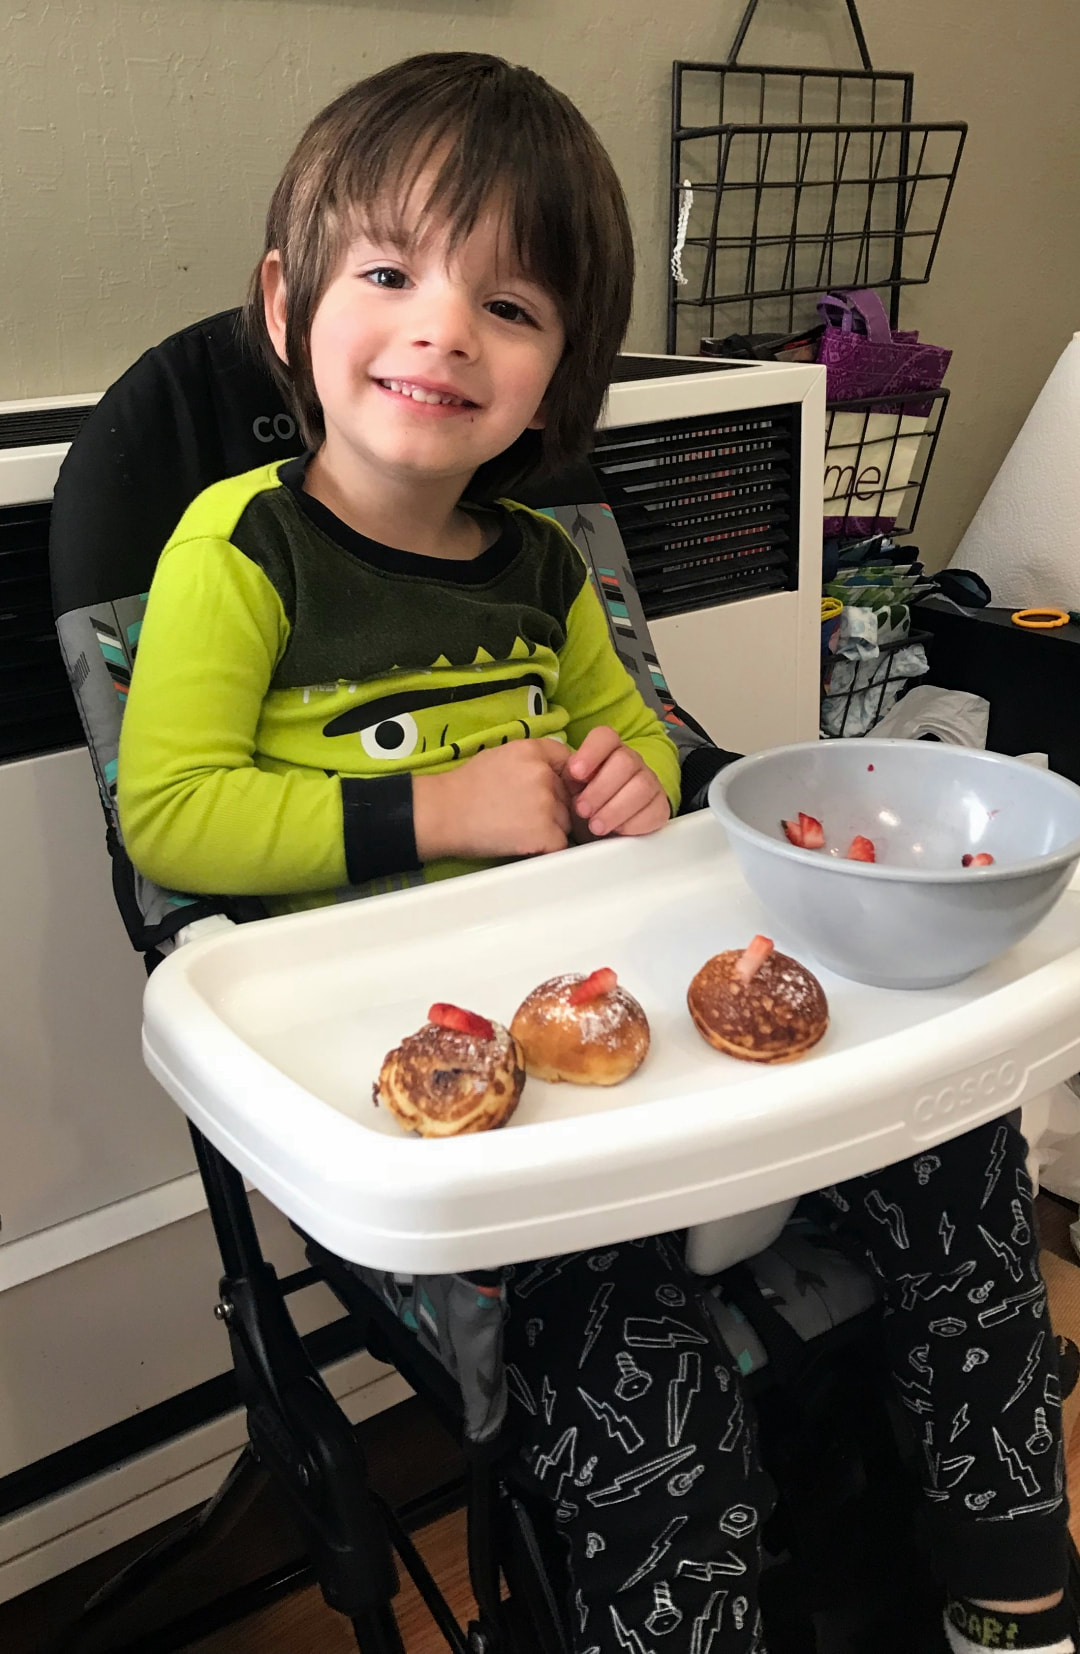 Katie also shared a recipe for Buttermilk Syrup that goes deliciously well with æbleskiver. I didn't make it the same day because I was out of buttermilk and Karo syrup. But I have made it before and let me tell you IT IS SO GOOD! So definitely give it a go. 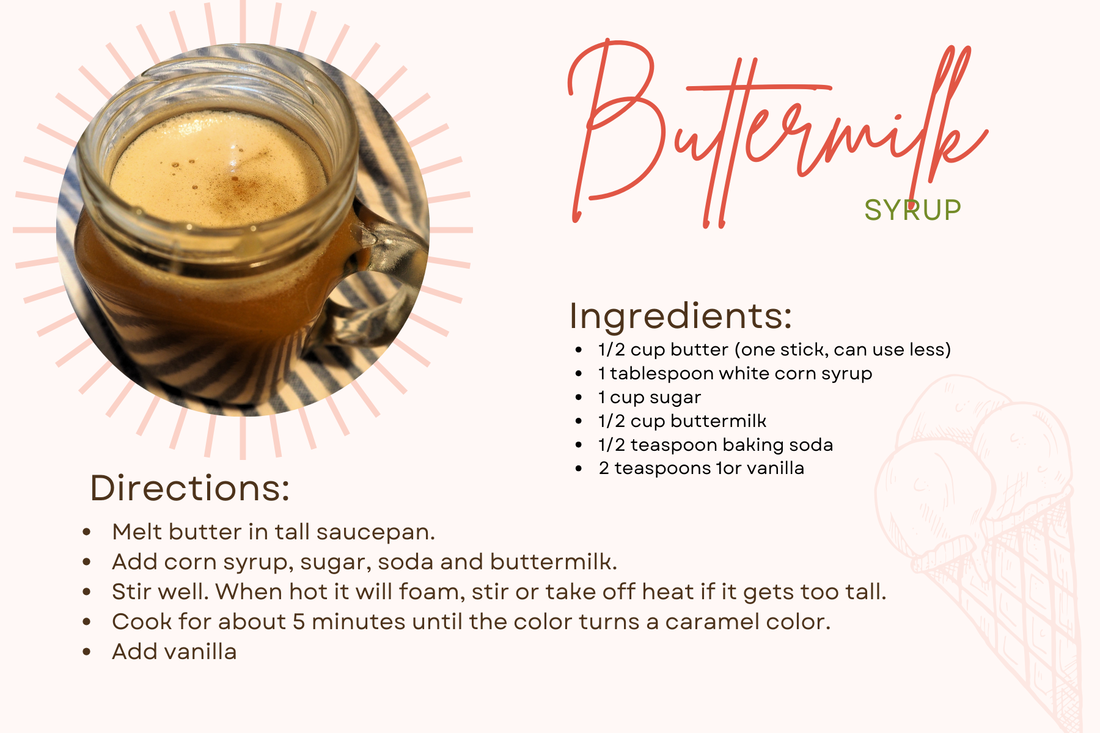
6 Comments

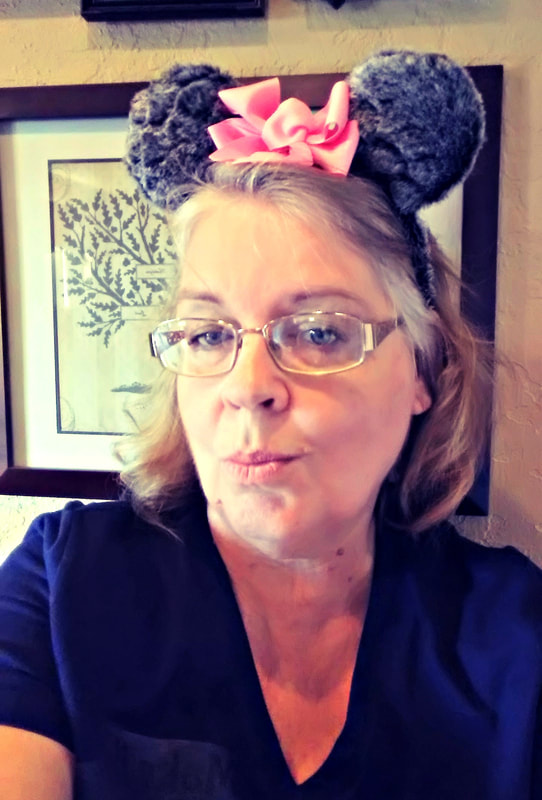
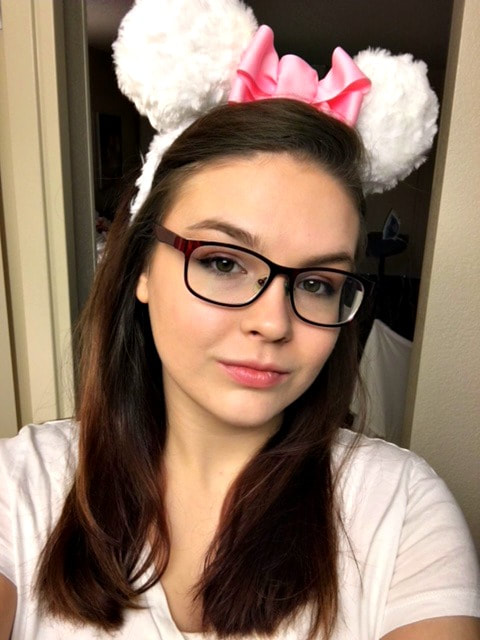
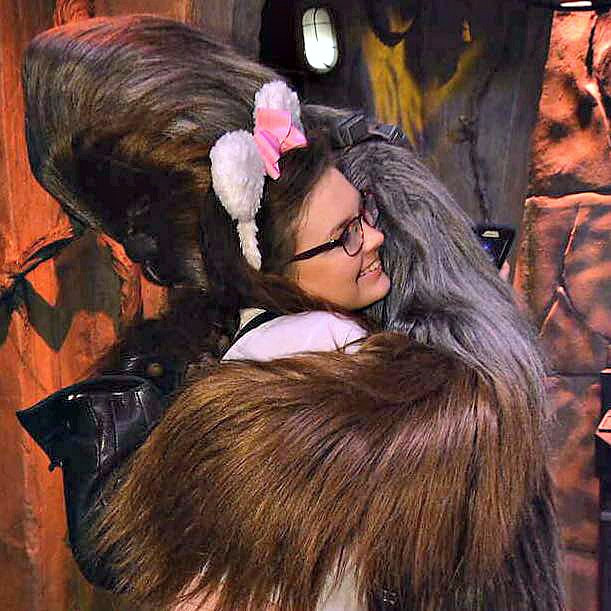
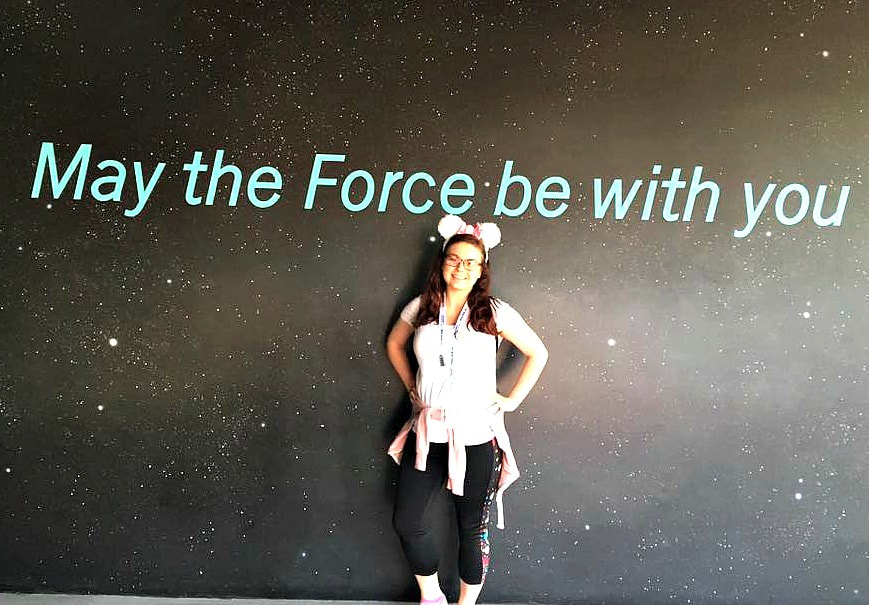
As you all should know by now, my mother and I recently took a week long trip to Disneyland. (She blogged about our top tips to make the most of your trip here. One of the things we did before the trip was make our own Minnie Mouse ears to wear around the park. These things usually retail for around $25. We made ours for a fraction of that price, around $5 a pair. And they came out so cute! We got complimented on them each day we wore them, and characters we met noticed they were different from typical ears so it made for interesting interactions. If you’re ready for your own cute and unique ears, keep reading to see how we did it. There is some minor sewing involved, but it really heightened the look and integrity of the ears.

To make these adorable easy Minnie ears you will need:
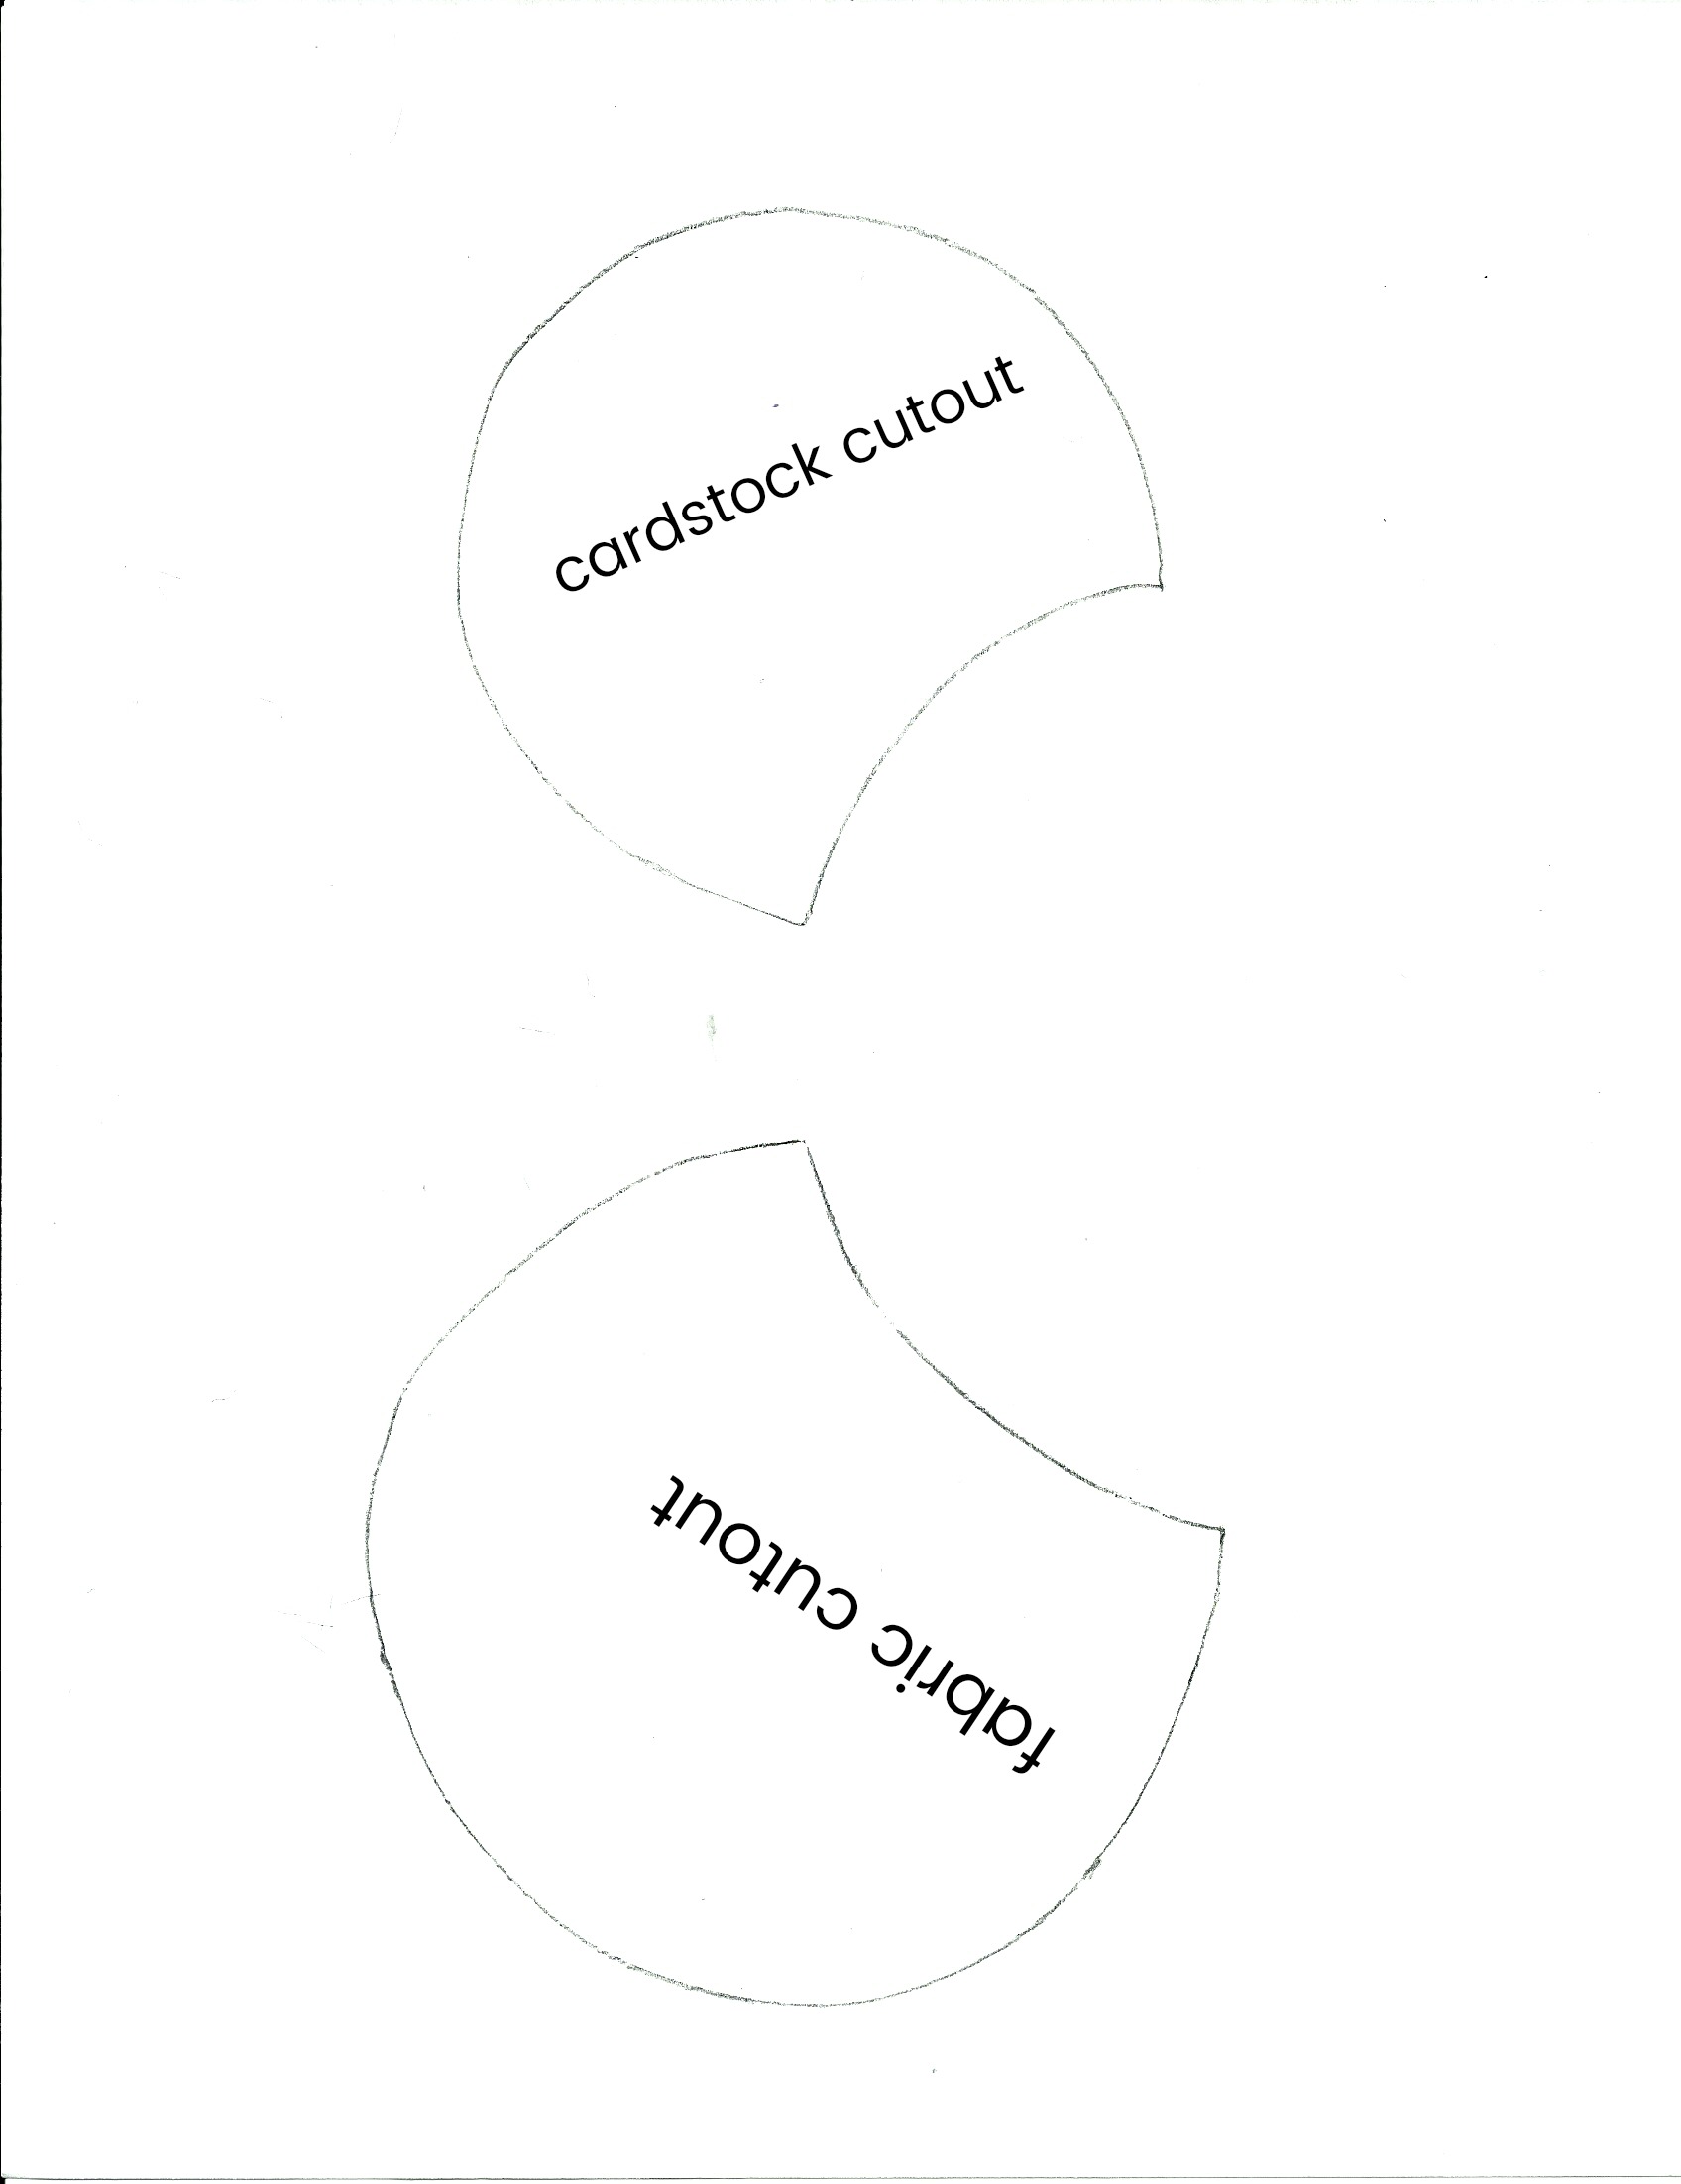
Fabric of your choice. (We chose faux fur because we were basing our ears off of specific characters) Ribbon of your choice (Again, ours matched the characters we chose) Headbands (or here) Cardstock Cotton stuffing Template Thread Hot glue Scissors Pencil 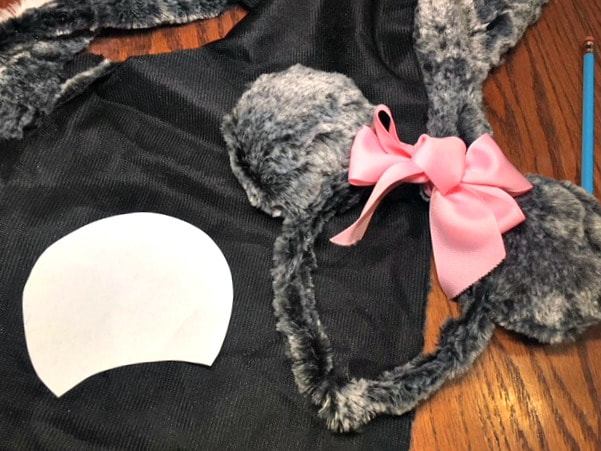
Constructing the ears is simple.
*Print the template out. There is one labeled for fabric and one labeled for cardstock. Cut out the fabric one and trace it onto the backside of your fabric 4 times. Cut these out and put them in pairs of two. Pin each pair together so the backside is facing out (they will look inside out). Sew around the outside of the ears, leaving the bottom open. Once they are sewn together, flip them right side out through the open bottom. *Now cut out the cardstock template and trace 2 of those out onto your cardstock. Cut them out and insert them into the ears through the open bottom. These will help keep your ears sturdy. *Stuff the ears with the cotton stuffing, being sure to get it on both sides of the cardstock and right up around the edges inside. Once the ears are as fluffy as you like, set them aside. *Measure your headband and cut out a strip of your fabric the same length and about double the width as it. Using hot glue, attach the fabric to the headband. It is easiest to do this in small sections, working from one side to the other. *Once that is dry, grab the ears again. Hot glue the open bottoms shut. Once the glue is dry, place the ears on the headband where you want them. When you think they look good, hot glue them in place. The last step is the easiest. Create a bow with your choice of ribbon and attach it to the center of the headband with hot glue. I also glued it onto the ears where they touched to add strength. 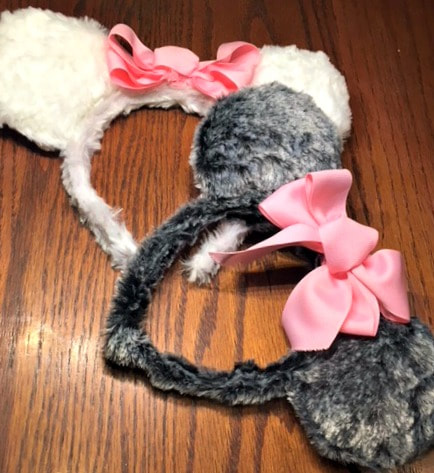
And that’s it! Easy, but so cute and durable. They survived getting soaked on splash mountain and the intense heat of California at noon, so they can take a lot. If you follow our tutorial and make your own Minnie Mouse ears, tag us on social media so we can see! Happy crafting!


This post contains affiliate links. If you make a purchase after clicking them, we will be compensated, but there is no additional cost to you. All opinions expressed are our own. Thank you for your support.
Today is officially Star Wars Day all because of that play on words used in our title! May the 4th be with you! Since we are all Star Wars Fans here, Friday Faves today is all about our favorite Star Wars Characters and why they are our favorites! I took a poll on Facebook and there were some strong opinions!
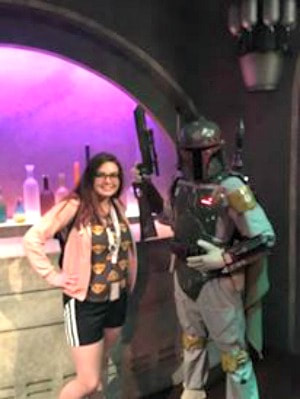
Maddy is a huge fan of Star Wars. While we were at Disneyland, she took advantage of the chances to see many of the Star Wars' characters. We had photos taken with Darth Vader and Kylo Ren and they were both very scary! The photos came out kind of scary as well, so we aren't posting them!
I will share with you who everyone likes and the reasons why from our straw poll. I will also share some Star Wars' memorabilia that we have found that you may be interested in. Just click on the picture to go to the link. Be sure to share your opinions either on Facebook, or in our comments section!

Luke Skywalker:
Han Solo:
Chewbacca:

Kylo Ren:

Obi Wan:

Yoda:

The Ewoks:

Darth Vader:

Princess Leia:

Qui Gon Ginn;

Admiral Ackbar:

The Droids:
If you have lived in the Dark Ages for the past 40 or so years and haven't seen the Star Wars movies, or if you would just like to get them all on DVD, I am putting links below! This would be a great day for a Star Wars Marathon! Or, at least a great time to watch your favorite episode! You can purchase the DVDs, or watch them with Amazon Prime!
May the Force Be With You!
Look at this awesome Mandalorian Lego set!

This post contains affiliate links. We will be compensated for driver's who sign up through our link. All views expressed are our own. Thank you for your support!
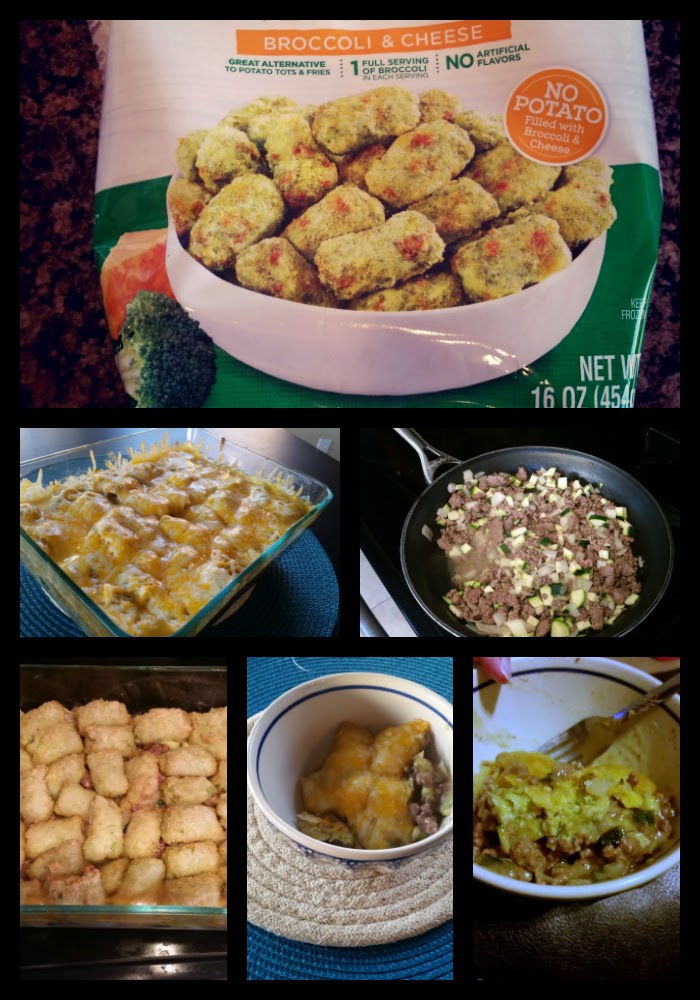
Are you a fan of casseroles? I'll admit there are some casseroles out there that I do not love The concept of the casserole however, is awesome. Throw a bunch of stuff in a pan and cook it and you've got dinner.
There were many times growing up where my mom would make us a casserole for dinner. She spent a lot of time serving other people while trying to feed her six kids on top of that, and casseroles were often the solution. One of my favorite casserole dishes is Tater Tot Casserole. Well this Veggie Tot Casserole will remind you of just that, but with a healthier spin! 
When I saw theses Broccoli and cheese veggie tots in the store I had to buy them! I got the brilliant idea to make a Veggie Tot Casserole by switching the tater tots out for the Veggie Tots! I am so glad this happened because the casserole tasted EVEN BETTER with these! I seriously could not stop eating it!
It is so cheesy and loaded with veggies. No regrets my friends, no regrets! Make it for dinner tonight. You'll be SO glad you did! |
Creators of Hot Cocoa Bombs! (copyrighted)

Author
Helen Reynolds: Mother of six children , grandmother to eleven! I love to cook, craft and create things and I especially love doing that with my family, So, when my lawyer daughter, Lindsey, my artist daughter, Madalynn, and I came up with the idea of Hot Cocoa Bombs, this blog was born. Then, one more daughter, with her technical and science skills, plus creativity has joined in to round us out! Read more about us here! 
Click this link and visit 3WinksDesignShop on Etsy. Find our Hot Cocoa Bomb Idea Book, our For the Love of PIe e-book and more of our creations!

Amazon Gift Cards are the Perfect Gift!
    Archives
April 2024
|


 RSS Feed