|
This post contains affiliate links. If you make a purchase after clicking them, we will be compensated, but there is no additional cost to you. All opinions expressed are our own. Thank you for your support

I am an extreme novice at wood burning, but I really want to get better at it. My DIL, who is much better at it than I am, recently introduced me to a product that is changing my wood burning life. I am still a novice, but now there is literally an entire new dimension to my wood burning because of this product!

The Scorch Marker contains a non-toxic chemical that allows you to write or draw on wood and then use heat to achieve the look of wood burning. In order to apply heat, you need a heat gun like this:

My husband recently bought me a heat gun because I told him that I wanted to try this craft! (Read about it here.) I have been having so much fun trying these new toys out! I have also been combining the Scorch Pen with my original wood burner to get a shading effect and to add depth to the things I do.

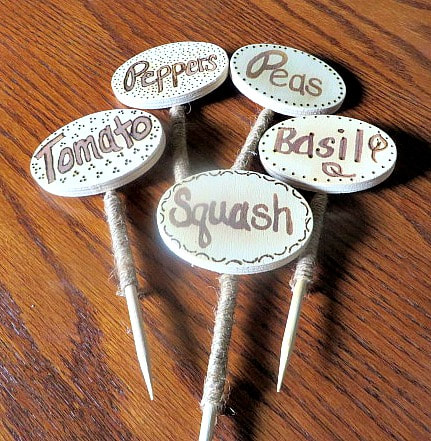
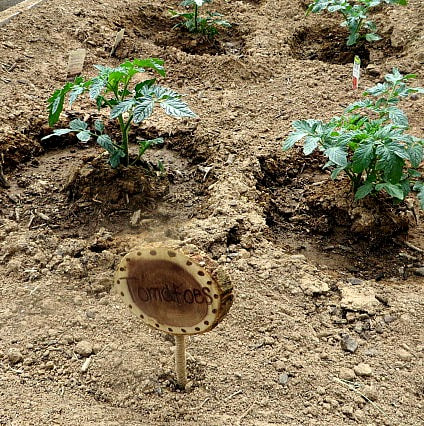
Since we have started to put in a small garden, I thought it would be fun to wood burn some cute garden markers to dress it up a little bit. In my novice way, I started out using wood slices which I later learned was not the best choice for a wood burning project because of the darkness of the center of the wood and because of the sap if the wood is pine. I made my first "Basil" marker before my Scorch Pen was delivered.
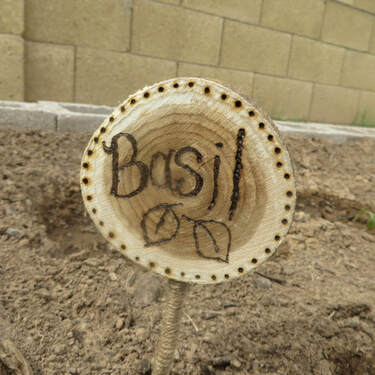
You can find some slices that are slightly lighter in the center, depending on the type of wood. But, these are what I had on hand. You can see that it is hard to see the writing with the dark center.
Then the Scorch Marker was delivered and I tried it on the wood slice again for my tomatoes.
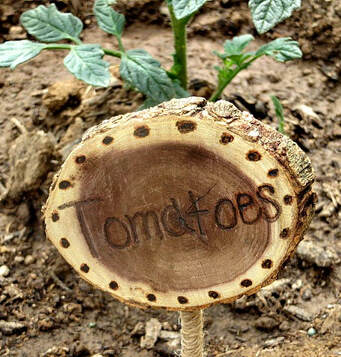
Unfortunately, the heat gun made the dark center even darker and I had to go over the entire thing with the regular wood burner. Also, I tried making the dots with the pen, but the chemical bled into the wood and made larger dots than I wanted. I tried to fix those with the wood burner, too.
I realized that I needed lighter wood with a finer grain, made of something other than pine, such as ash or basswood. I had some of these lighter wood shapes. I don't know what wood they are but I tried them out with much better results.
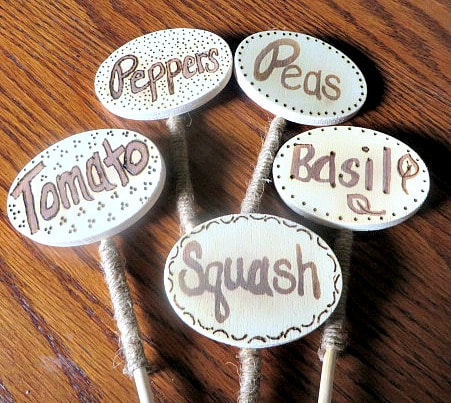
You can see that some of the time I used only the Scorch Pen for the lettering, and sometimes I outlined the Scorch marking with the Wood Burner. I like it both ways. I always use the regular wood burner for the dots and small details.
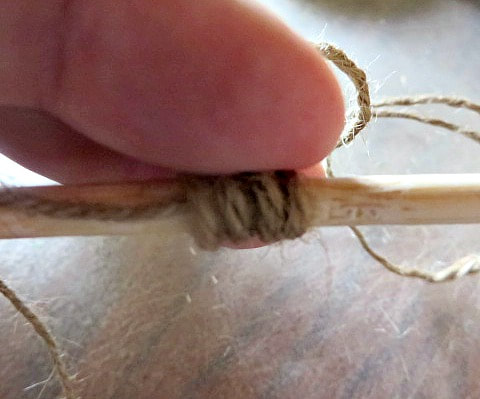
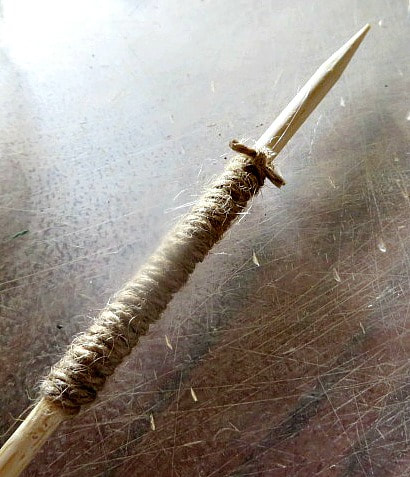
Here is how I put the markers together, just click on the photos to see better.
I am enjoying learning something new! Here are some the things I have learned so far:
So, give the Scorch Marker a try and have some fun with it! I feel like the possibilities are endless and I have just begun to scratch the surface! If you've tried it and you have any tips, please let me know in the comments!

17 Comments
3/21/2019 07:03:06 am
Thanks so much for linking up with us at the #WednesdayAIMLinkParty 33! Shared ♥ 3/25/2019 07:15:49 am
I like the different wood species that you used as well as the variety of patterns and outlines. Very creative! 3/25/2019 09:07:35 am
These are greats. I love the idea of using wooden spoons. Your work does not look novice to me. It looks great. 3/25/2019 09:16:36 am
The Scorch Marker looks like a great invention, how cool is that? Love your wooden plant and herb garden markers! Shared ♥ 3/25/2019 01:08:32 pm
These look very professional and should last a long time. I like the idea of upcycling wooden spoons. 3/26/2019 06:08:27 pm
Clever, artistic, practical idea. I hope your garden turns out as well. I'm not gifted to do things like this but I'm glad others are. 3/27/2019 08:03:34 pm
What a coincidence! I did some spring cleaning in my craft loft today and came across our wood burner. I can make these! Would love to have a little herb garden and make some of these for it. Thank you for sharing what worked and what didn't work as well, and your shopping links. 5/24/2021 10:09:19 pm
Perfect markers! Thanks so much for linking up with me at A Themed Linkup 58 for Vegetable Gardening. Pinned! 5/19/2022 04:54:22 am
Visiting again to say thanks so much for linking up at A Themed Linkup 109 for Vegetable Gardening. Pinned. 4/25/2023 04:15:58 am
Visiting again to say thanks so much for linking up at #AThemedLinkup 149 for Gardening. Shared. 5/1/2023 05:10:43 am
CONGRATS Helen! Your post is FEATURED at #AThemedLinkup 150 for Laughter Is the Best Medicine from the previous linkup for Gardening. Your comment will be posted after it is approved.
Leave a Reply. |
Creators of Hot Cocoa Bombs! (copyrighted)

Author
Helen Reynolds: Mother of six children , grandmother to eleven! I love to cook, craft and create things and I especially love doing that with my family, So, when my lawyer daughter, Lindsey, my artist daughter, Madalynn, and I came up with the idea of Hot Cocoa Bombs, this blog was born. Then, one more daughter, with her technical and science skills, plus creativity has joined in to round us out! Read more about us here! 
Click this link and visit 3WinksDesignShop on Etsy. Find our Hot Cocoa Bomb Idea Book, our For the Love of PIe e-book and more of our creations!

Amazon Gift Cards are the Perfect Gift!
    Archives
July 2024
|

 RSS Feed