|
This post contains affiliate links. I will be compensated for purchases made through those links at no additional cost to you. Thank you for your support!  When I was a young mother, I would work so hard to do everything during the holidays to help my family feel the true meaning of Christmas. I wanted them to know why we celebrated and I also wanted them to feel the magic of the season. We watched every Christmas special, we drove around and looked at lights, we did acts of service for others, we sang carols, we read about the birth of the Savior, we went and saw Santa, we put up the tree and decorated it, we got gifts for each other and had fun secrets. I baked and made candy and decorated the house like crazy. I loved it! My kids loved it! But, now that my children are all adults, it has been quite a transition to not being the one that everyone looks to to make Christmas special. I have grandchildren and their families have their own traditions that they are creating and plus other grandparents to be involved with. This year, I had decide to take a look at what really puts me in the Christmas Spirit and to concentrate on those things. Here is what I have realized about myself:
It took me a while to come up with what I could make this year. But, as you know, I have been loving the buffalo plaid decor this year and I actually had purchased a Christmas Tree from Walmart for my table. I decided that I needed more of them and wouldn't it be great to use a cinnamon stick as the trunk and a wood slice as the base. I thought how great to give a little tree with my plates of goodies! So, I whipped some up and here is how I did it: 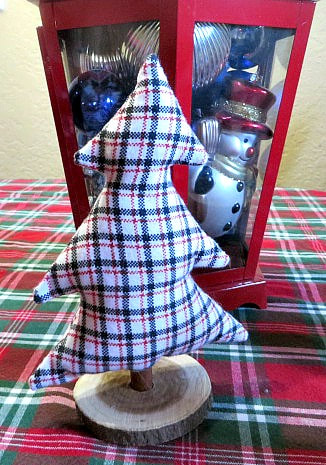 Supplies: Coordinating plaid flannel fabric Cinnamon sticks Fiber fill Wood slices Sewing Machine Thread * I used the tree that I already had as a guide to make a pattern. But, I also made smaller ones and then cut out two pieces for each tree. Then, with right sides together, stitch around each tree, leaving the bottom open a few inches in the center. * Trim the seams and points of the branches and then flip the tree right-side out. * Stuff Fiber fill into the corners at the top of the tree. Wrap a cinnamon stick with fiber fill around the top portion and push it up through the opening at the bottom. Then, fill around it with more fiber fill, especially shoving it into the corners. * When it is nicely stuffed, stitch the bottom closed with a whip stitich across and going around the trunk. Tip: When choosing a cinnamon stick, try to get one with a nice round end so that it will fit neatly in a whole the size you have a drill bit for. * Drill a hole through your wood slice and glue the cinnamon stick in it for your tree to stand. 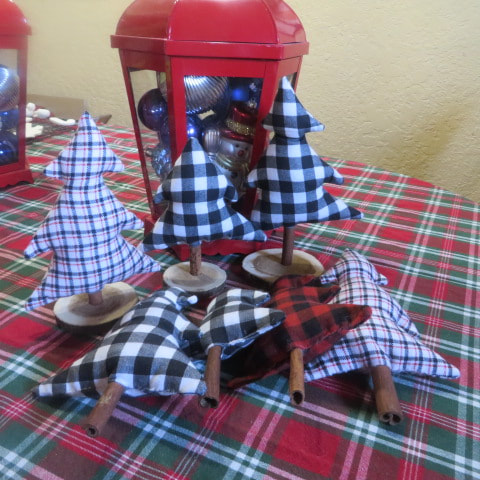 I love these! I had a bunch all done in no time! Thanks to my husband and his drill! 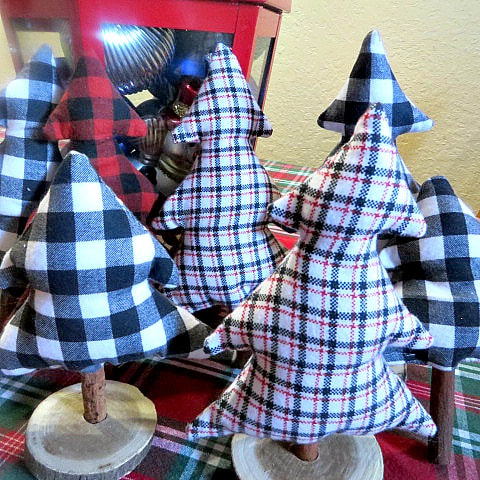 How Merry! What gets you into the Christmas Spirit? I would love to hear from you! For more great ideas for DIY gifts, check out this post, a Zero Waste Gift Guide!
3 Comments
This post contains affiliate links. I will be compensated for purchases made through those links at no additional cost to you. Thank you for your support!
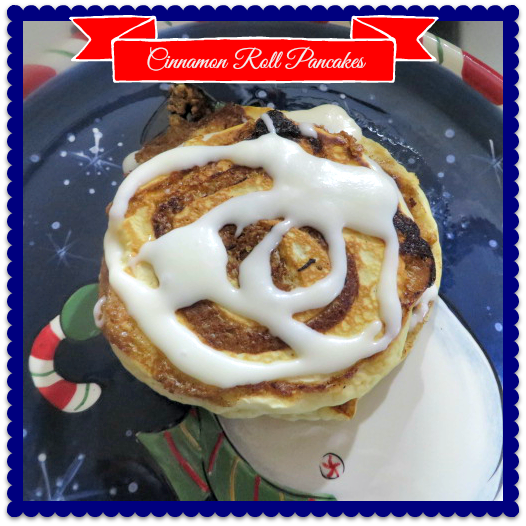
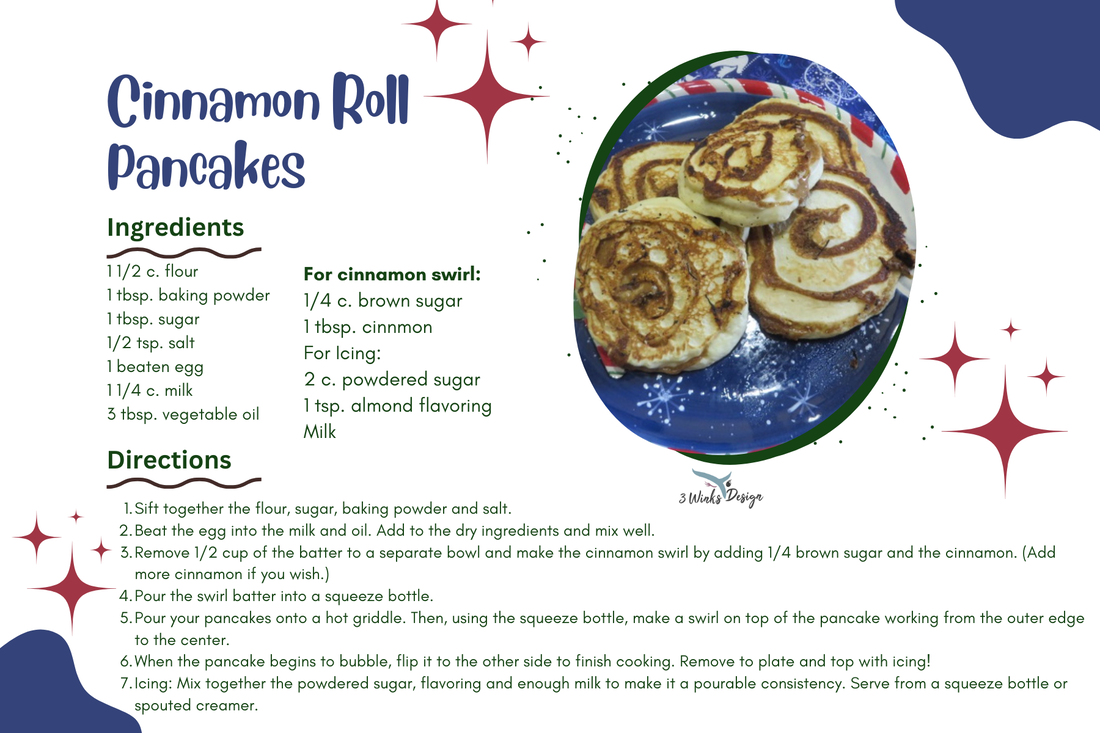
Back in the Fall, I went to visit my family in my hometown of Clovis, CA. While there, I went with some of my family to a pancake restaurant called Batter Up. I had their cinnamon roll pancake that day. It was so good that I knew that I had to try to make one of my own! So, I began trying various recipes and experimenting on my own. My SIL sent me a recipe that he had used from the Food Network, and I liked it. The only problem was that the butter and sugar recipe used for the swirl would burn on the griddle and I would have to clean the griddle between each set of pancakes cooked to avoid a burnt taste on them. That was unacceptable.
Then my son commented that if it were him, he would just make 2 batters, a cinnamon one and a plain one and swirl them together. I considered that idea, but I knew that I wanted the cinnamon sugar experience that you get with cinnamon rolls. Then I discovered the secret! I added some batter to the cinnamon sugar mixture, left out the butter and it worked amazingly well! So, the credit for this recipe goes to many: Batter Up, Food Network, SIL Adrian, Son Tyler and ME! 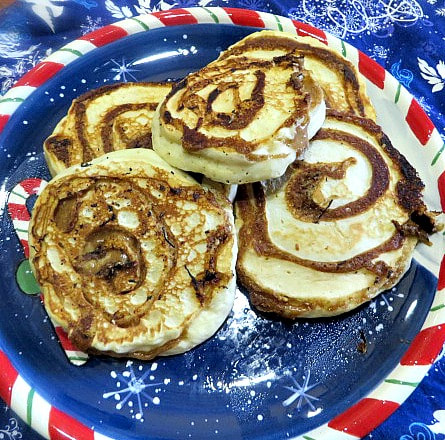
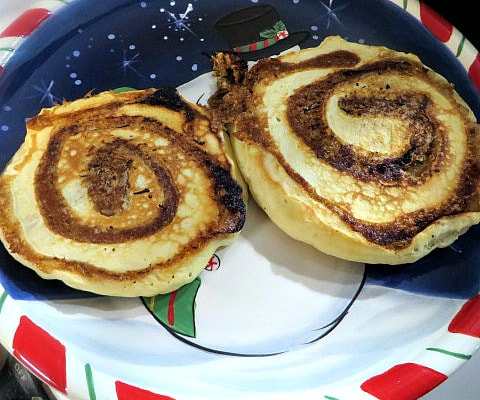
Christmas Morning Breakfast!
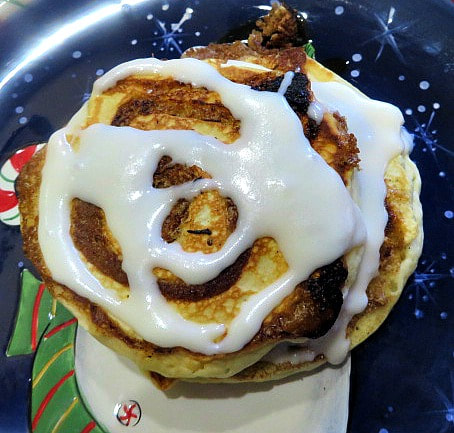
These pancakes would make the best Christmas morning breakfast. I mean, they are like cinnamon rolls and you don't have to let them rise! They are fluffy, cinnamony and topped with almond flavored icing that puts them over the top!
You just pour the batter onto a hot griddle and then add the swirl. I like to put the swirl batter in a squeeze bottle. It gives you greater control. 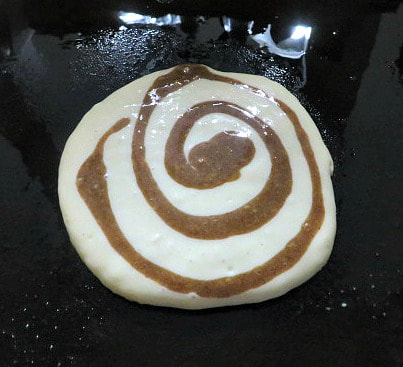
The high content of sugar in the swirl batter still melts, but doesn't burn and really gives that cinnamon roll affect.
You can add butter, or not, but be sure to add the icing on the top! For a Christmas breakfast, you could even add sprinkles!
This post contains affiliate links. I will be compensated for purchases made through those links at no additional cost to you. Thank you for your support!
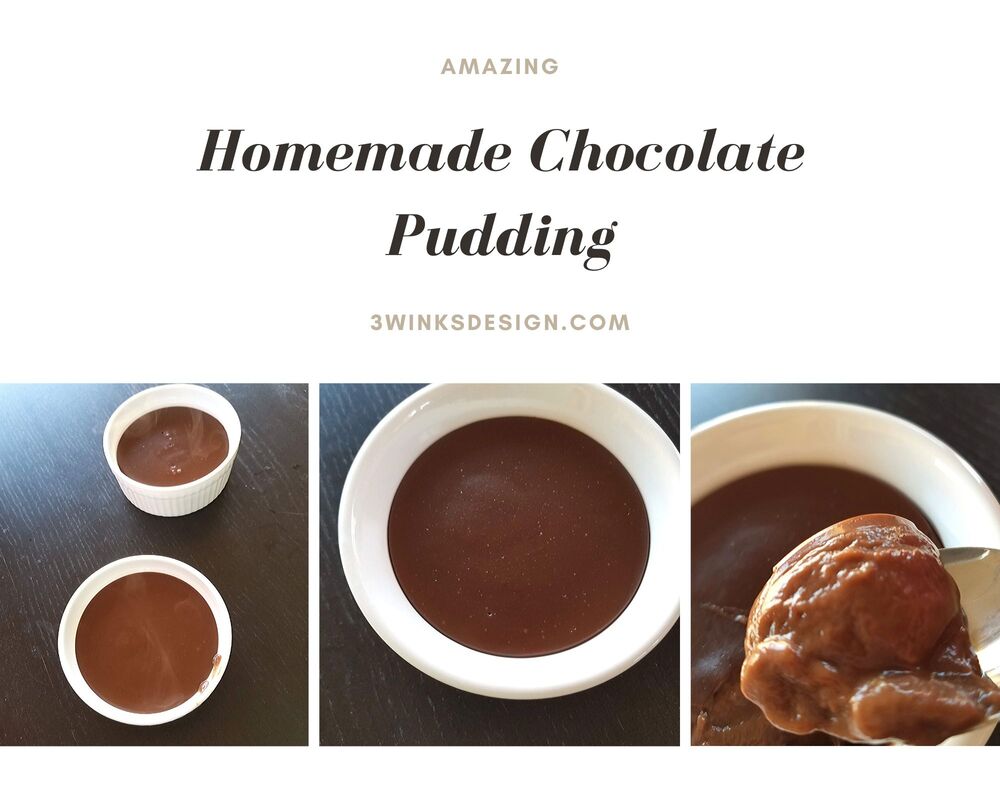
If you don't know this by now, my mom (Helen, the boss of this blog) watches my daughter while I am at work during the week. When I picked her up on Thursday my mom told me they had had pudding that day. My daughter had never had pudding before and the experience clearly left an impression on her. At bedtime that night she told me she wanted pudding. When I told her no, she said she wanted Grandma. When I told her know, she told me she wanted Grandma and pudding.
Fast forward to this weekend and she has been sick. Although she's had a fever and a cough she's been pretty happy. It has however, been really hard to get her to eat or drink anything. So today, in a desperate attempt to get her to put SOME food into her little tummy I made her some pudding. She ate one bite and didn't want any more, but don't let that fool you about this homemade chocolate pudding. It is AMAZING! It is smooth and creamy and chocolate-y and happiness in a bowl. Also, it is EASY to make it vegan! Just swap out the butter for your favorite vegan variety and boom! Vegan chocolate pudding. Pudding really is a great treat that we do not indulge in very often around these parts. However, this homemade chocolate pudding was so easy to make and tasted so good that I'm pretty sure I'll never buy the box varieties again!
This post contains affiliate links. We will be compensated for purchases made through those links at no extra cost to you. All views expressed are our own.
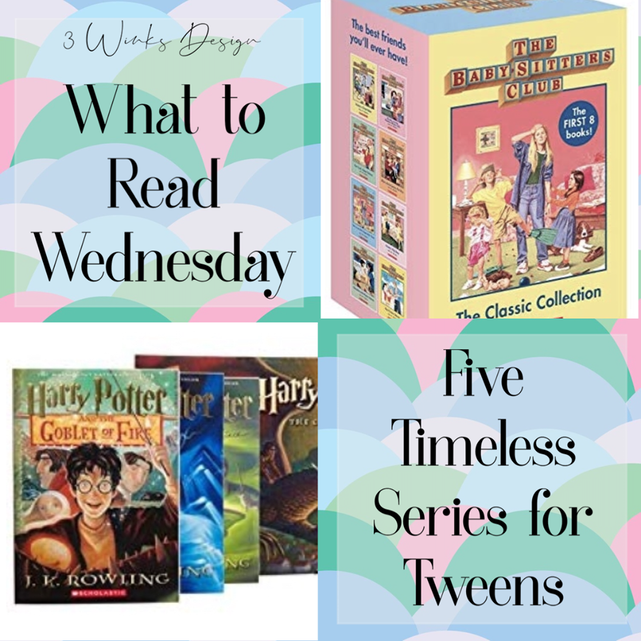
Today I thought I’d do a What to Read Wednesday gift guide for tweens. And I also wanted to combine it with books that would take you back to your childhood. At least my childhood. These series are timeless classics that will just get better with age.
1. Babysitter’s Club. All about that entrepreneurial spirit and learning important life lessons, Babysitter’s Club will suck your tween into the story. The era may be different but the problems the girls in the books faced are still problems kids face today.

2.Harry Potter. Being a huge Harry Potter fan, how could I NOT mention it? The struggle to find where he fits in the world, starting a new school, making friends, choosing between right and wrong, dealing with grief, fighting a powerful wizard; Harry Potter is one of the most relatable characters in literature. The rereadability is off the charts too so this series will keep giving for life!
3. Goosebumps. I have already written a WTRW post on Goosebumps, which you can check out here. It will suffice me to say that there’s a reason these books are still around. Tweens will love the horror aspect while parents can feel happy it never gets gory just chilling.

4. Anne of Green Gables. Talk about relatability, although Anne grew up in the early 1900’s, her struggles with friends, boys, and family will be familiar to your young reader. She’s also a little over dramatic, a huge plus for me as a child as it gave me one of my favorite phrases of all time “I’m in the depths of despair.”

5. A Series of Unfortunate Events. I loved these books in Junior High. I even got my mom into reading them. The books follow the Baudelaire orphans through a series of unfortunate events while being “chased” by Count Olaf in order to steal their fortune. The kids use their talents and ingenuity to work together and get out of trouble, but things don’t always work out the way you plan. These books have a way of disappointing you without frustrating you at the same time. It’s all very delightful actually, you’ll want to keep reading because you have hope things will get better.

I hope you’ve enjoyed this stroll down memory lane with me. I love these books, and would still reread them all today. I hope you and your tween will enjoy them too. It isn't too late to add them to their Christmas list!
What book series did you enjoy when you were younger? What would you add to the list?
|
Creators of Hot Cocoa Bombs! (copyrighted)

Author
Helen Reynolds: Mother of six children , grandmother to eleven! I love to cook, craft and create things and I especially love doing that with my family, So, when my lawyer daughter, Lindsey, my artist daughter, Madalynn, and I came up with the idea of Hot Cocoa Bombs, this blog was born. Then, one more daughter, with her technical and science skills, plus creativity has joined in to round us out! Read more about us here! 
Click this link and visit 3WinksDesignShop on Etsy. Find our Hot Cocoa Bomb Idea Book, our For the Love of PIe e-book and more of our creations!

Amazon Gift Cards are the Perfect Gift!
    Archives
July 2024
|


 RSS Feed