|
This post contains affiliate links. I will be compensated for purchases made through those links at no additional cost to you. All views expressed are my own. Thank you for your support!
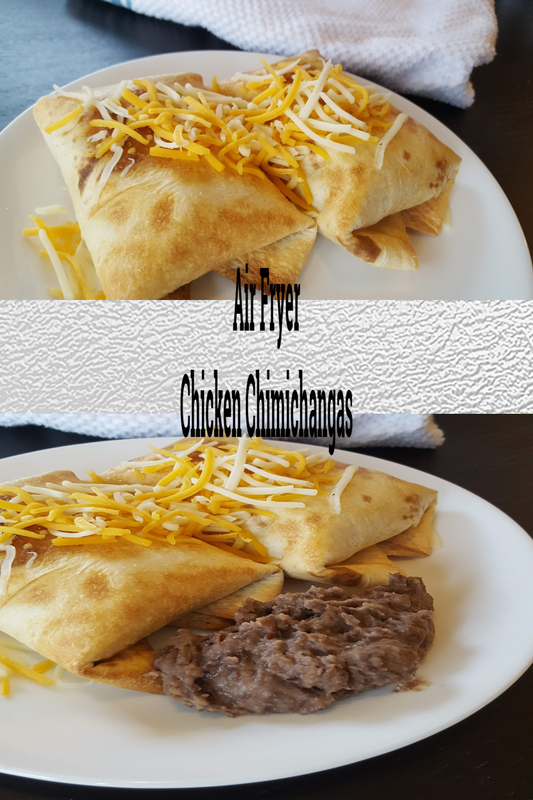
I am back with another Air Fryer recipe and renewed zeal! Maybe it's the purchase of our air fryer, but I have a goal to plan out our home meals two weeks at a time, preparing our shopping list accordingly, and go forth and cook!
This is great news for you dear reader, because I will have so many new recipes to share! Like this delicious Air Fryer Chicken Chimichanga recipe! Raise your hand if you have an air fryer and love it! Raise your hand if you love chicken chimichangas! 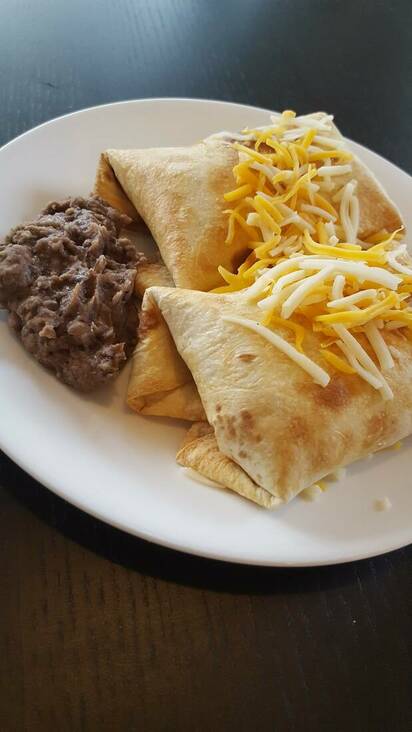
Raise your hand if you think the combination of air fryers and chicken chimichangas into one great Air Fryer Chicken Chimichanga sounds amazing!
(Psst. Your hand should be up!) I made these Air Fryer Chicken Chimichangas for dinner on Saturday and they were a hit! The air frying part goes so fast! I'll admit, I cooked the first two for about 8 minutes and they were pretty dark. They still tasted delicious though, I just prefer a little lighter. If you like dark tortilla crispiness on your air fryer chicken chimichangas, go right ahead and leave them in a couple minutes longer! The chicken was so moist and delicious. Salt your chicken before cooking!!! And save some of the chicken broth because you'll need it for the filling! I served these with a side of my vegan refried black beans. It was a great meal. Our baby girl chowed down on them! And she only has five teeth! So, pull out your air fryer and get to making these Air Fryer Chicken Chimichangas because they are just what this Monday needs!
What you will need for this recipe:
2 Comments
This post contains affiliate links. If you make a purchase after clicking them, we will be compensated, but there is no additional cost to you. All opinions expressed are our own. Thank you for your support.
We have people over for dinner quite often, whether it is family or friends who are like family or people we are just getting to know. When I have the same people over very often, I have to change up what I cook, but when I am having people over for the first time, there are a few menus that I go to for "company meals." Now that my girls are all off living on their own, I asked them what meals they like to serve when they have friends over. We came up with a nice variety of choices! Some can be served a little nicer, but many lend themselves to more informal, comfortable, and delicious nights of food and gathering together. So, today for Friday Faves the question is:
What do you like to serve company for dinner?
2. Coming in at a close 2nd to taco night is Green Chili Burro night. This one involves a roast in a crock-pot and once again all of the Mexican toppings. Plus, there is usually rice and beans to go along with it. Maybe some Guacamole. If we are having a large crowd, I sometimes serve both tacos and burritos.
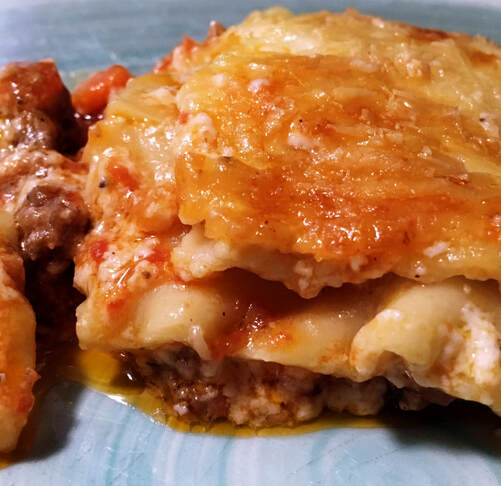
3. Lasagna is always a great crowd pleaser and you can serve a lot of people with it and some salad. Alicia shared her recipe for the Best Lasagna Ever awhile back. And Lindsey made a Zucchini Lasagna here. Now I am really hungry for lasagna just thinking about it!
4. Along those Italian lines, Lindsey and Maddy both like Spaghetti! Lindsey likes to be able to toss the sauce in the crock pot and Maddy can make it without meat. Lindsey may even serve it over spiralized zucchini. 5. Stuffed Shells are similar to Lasagna, but maybe a little fancier? They are a favorite of Lindsey's. 6. Speaking of crock-pots, they can really help relieve the stress of getting food made and the house straightened for company at the same time! Or, if you work the day that company is coming, you can just throw something in it in the morning and it will be delicious and ready by the time you get home. One of my favorite go-to meals, and my family's favorites is this Chicken Casserole that I showed in the crock-pot, but often make in the oven as well. People always love it. I am still just learning how to use my Instant Pot, or I am sure that I would have recipes on here for using it, too. 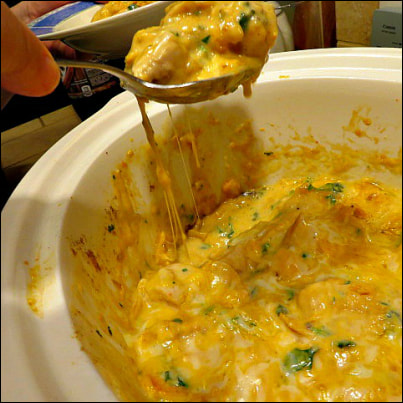
6. The final thing that we love to serve is grilled burgers, my husband's favorite! Practice and find the method that you love when it comes to grilling burgers, add all of the toppings and some good sides and you will be set!
What do you like to make for company? Leave us a reply in the comments!
Past Friday Fave you may have missed but shouldn't have:

This post contains affiliate links. I will be compensated for purchases made through those links at no additional cost to you. All views expressed are my own. Thank you for your support!
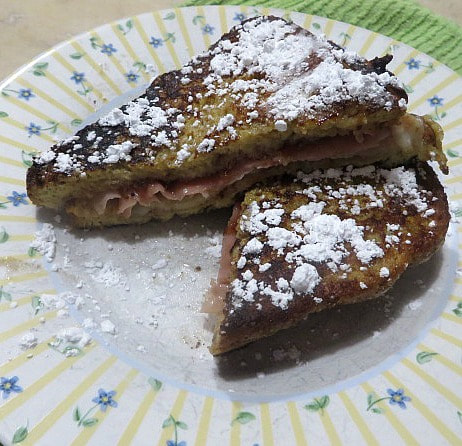
I have seen many recipes over the years for Monte Cristo Sandwiches. They have intrigued me and I have wanted to give them a try, but for some reason I never have. Well, that changed Saturday morning. For some reason, I was thinking about the book, The Count of Monte Cristo, when I woke up in the morning. Then, I thought about breakfast for my husband and I and BINGO, I decided that Saturday morning would be the morning that I gave Monte Cristo Sandwiches a try! (Yup, that is how my mind works.)
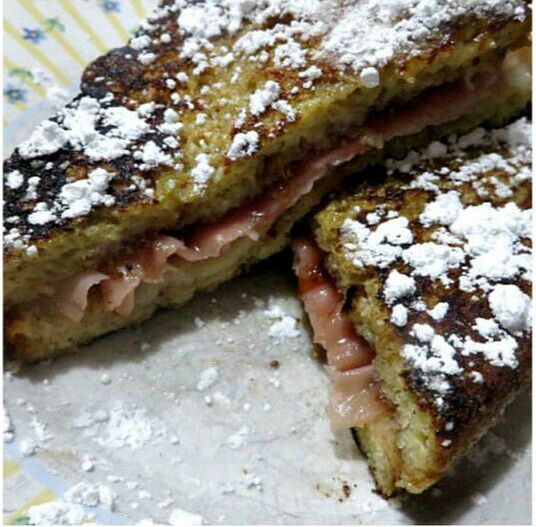
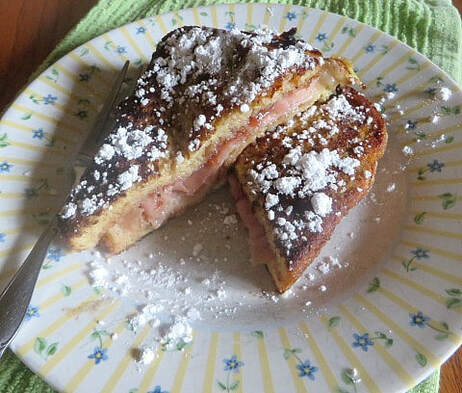
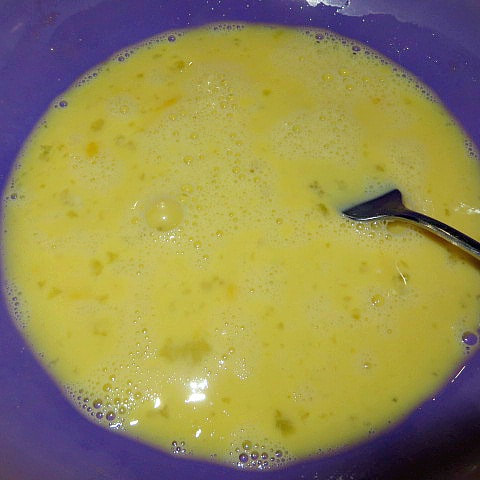
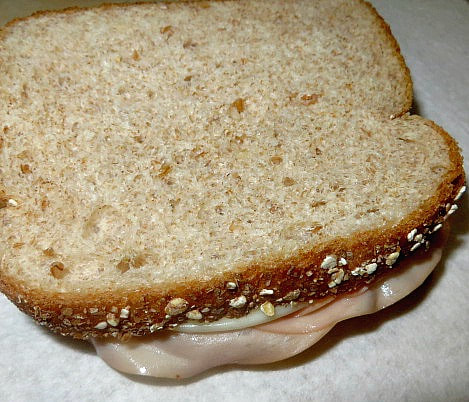
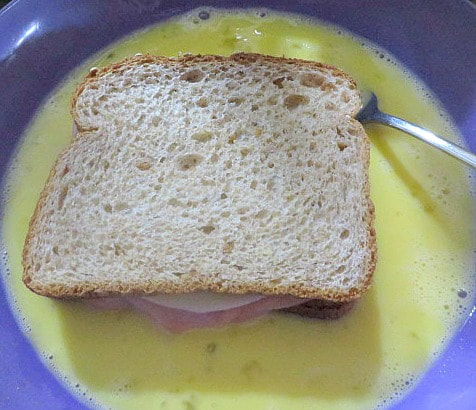
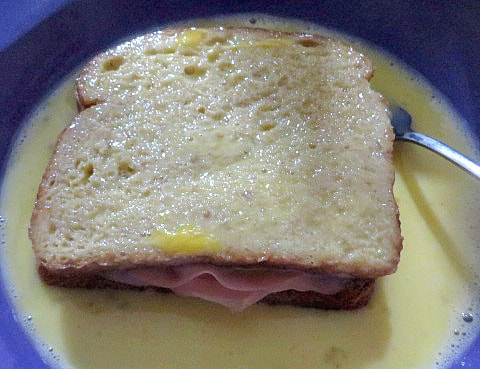
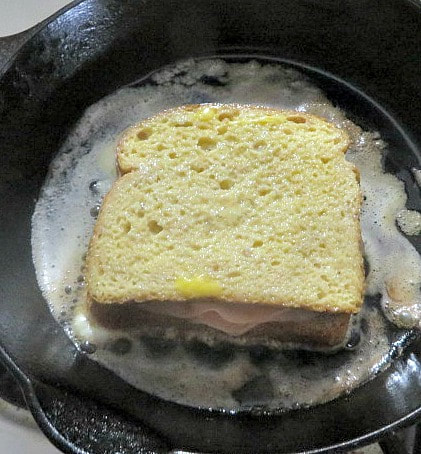
A traditional Monte Cristo Sandwich is a breakfast sandwich made with Ham & Cheese, fried in butter and served with a side of strawberry jam and sprinkled with powdered sugar. The sandwich is first dipped in a egg batter, like French Toast before frying it. Since I love French Toast, the Monte Cristo Sandwich is right up my alley. It is believed to be based on a French sandwich called Croque Monsieur. I have seen many variations on the recipe, and today I am sharing my own, made with smoked turkey and provolone cheese. It came out so well, I am excited to try other variations of the meat and the cheese. The thing that is amazing about this breakfast sandwich is how great the strawberry jam tastes with the meat and cheese! It is the perfect combination of sweet and savory and made a really nice breakfast on a very nice day. My husband really liked the sandwich and preferred it to be really crispy, toasty. Of course, I used homemade strawberry jam on it. I didn't serve it on the side, I put the jam right on the sandwich with the turkey and cheese. I used a honey-wheat bread for our Monte Crisos, but any variety of bread would be great. The possibility of combinations are endless! Click on the gallery of photos for an overview of how to make this special breakfast sandwich.
Here are a couple of tips:
Here is the recipe that I made:
The next time you want something a little different and a little special for breakfast or brunch, give Monte Cristo Sandwiches a try!
This post contains affiliate links. If you make a purchase after clicking them, we will be compensated, but there is no additional cost to you. All opinions expressed are our own. Thank you for your support.

My husband and I accomplished a lot this past weekend. it was so great! It all started on Friday. I had been off doing a church assignment that morning and when I got home, he had left for work. But, before he left, he had gone on a shopping spree which is very unusual for him. He had been to Harbor Freight and sitting in the middle of my family room was a camp chair and a flashlight with a note that said "Happy Birthday!" He knew I needed a new chair for Girl's Camp this summer, so he picked me up one like he has, which is a favorite! (He had a coupon that made it cheaper!) Then, on the dining table, there was another package with a note that read, "Merry Christmas!" It was a heat gun! I am so excited because I had told him about a craft that my daughter-in-law is doing and I want to give it a try. It requires a heat gun and the one he got me is really nice, with variable speeds and temperatures! (Once again, a coupon!) More to come on that project!
Well, I don't really know what has gotten into him, but later that evening, after Awesome Husband was home from work, we were talking about various projects around the house, I mentioned that I wanted to get some tomatoes and basil planted in one of the garden boxes that we have out in our backyard. Well, the next morning he went out there and dug up the soil in that box and got it ready to plant in and we went off to the home improvement store and purchased the plants that we needed. They are now planted and growing and looking good so far. I hope you will later be seeing some recipes with the produce from that garden box! You got to love a man who does something to make one of your wants come true so quickly! The fun didn't stop there! This man of mine then went into my craft room and finished putting up all of the moldings, miter cuts and all, and even along the top of my sewing desk! All there is left to do is the caulking and paint touch-ups. It is looking so wonderful! Meanwhile I was doing some fancy cooking for him that I will blog about on another day, and the not so fancy laundry. But, today I will show you how the craft room is coming along at this stage of the game!
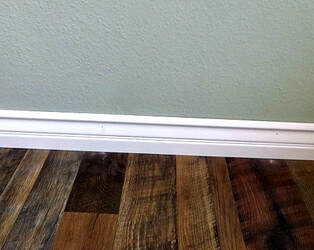
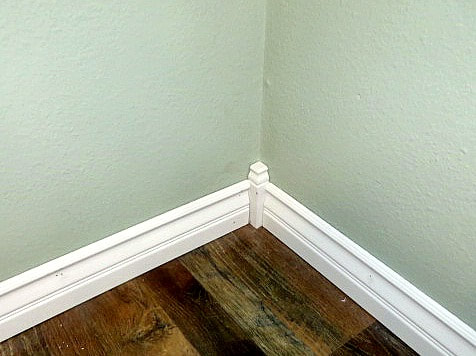
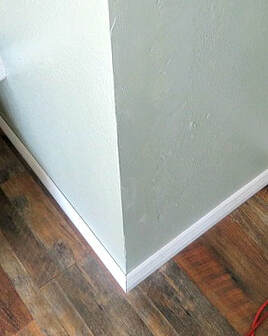
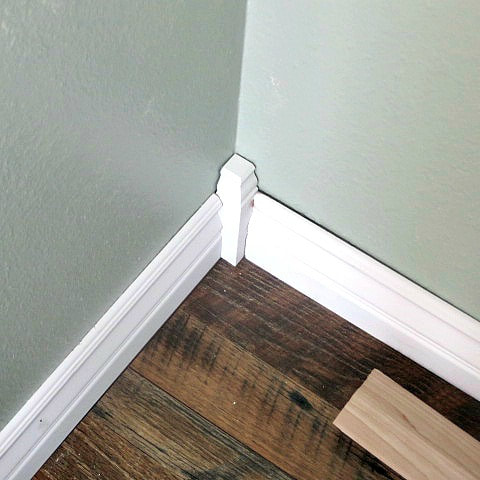
You can see my last updatehere. On that post I made a list of the things that still need to be done. We can just about cross off the trim moldings because all we have left to do is caulk and paint! Look how beautiful they are!
Another thing that I have started on, but have by no means completed, is the organization process. Since I have shelves in there that are available for use and it won't be in my husband's way if I start to fill them, I have begun going through things and putting them on these shelves.
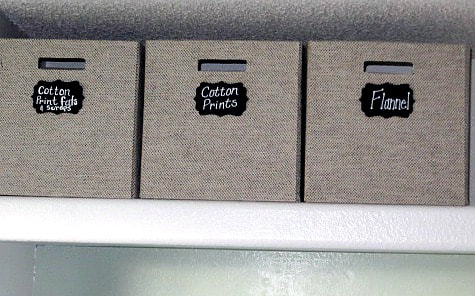
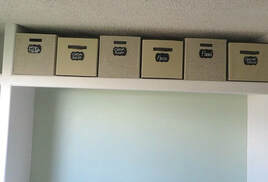
A few years ago, I found some fabric boxes that are 13 x 13 inches on clearance at Target and they fit on my long shelf just right! I was able to get a super good deal on them at the time, so keep your eyes open for those clearance sales and weekly ads. I only had 3 and I needed 6 in all, so I ordered these from Amazon. But, there are a number of options available. My husband is going to add another long shelf below the original one for me and I will store my fabric boxes on that shelf when it is finished, saving the top shelf for less used items.
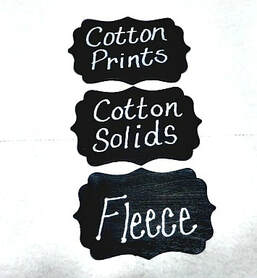
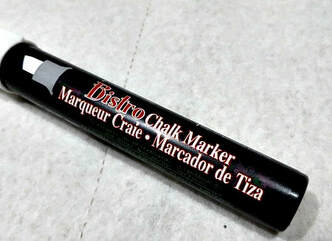
I decided that I needed a way to label the boxes with the type of fabrics that they are holding. I had some little wooden shapes that we had decorated with chalkboard paint at our Christmas in July party this past year. I thought they would look great on my boxes and I do really like them. I simply painted them with black chalkboard paint and used a chalk marker to hand letter them with the types of fabrics that I have.

I am loving the look, but looking forward to the lower shelf so that they will be easier to reach!
All in all, it was a pretty productive weekend that left us feeling satisfied with life around here! How about you? What projects are you working on? I would love to hear about them. Of course, I may end up giving my husband something else to do for me if I like them too much, ha ha! Thanks for stopping by! |
Creators of Hot Cocoa Bombs! (copyrighted)

Author
Helen Reynolds: Mother of six children , grandmother to eleven! I love to cook, craft and create things and I especially love doing that with my family, So, when my lawyer daughter, Lindsey, my artist daughter, Madalynn, and I came up with the idea of Hot Cocoa Bombs, this blog was born. Then, one more daughter, with her technical and science skills, plus creativity has joined in to round us out! Read more about us here! 
Click this link and visit 3WinksDesignShop on Etsy. Find our Hot Cocoa Bomb Idea Book, our For the Love of PIe e-book and more of our creations!

Amazon Gift Cards are the Perfect Gift!
    Archives
April 2024
|


 RSS Feed