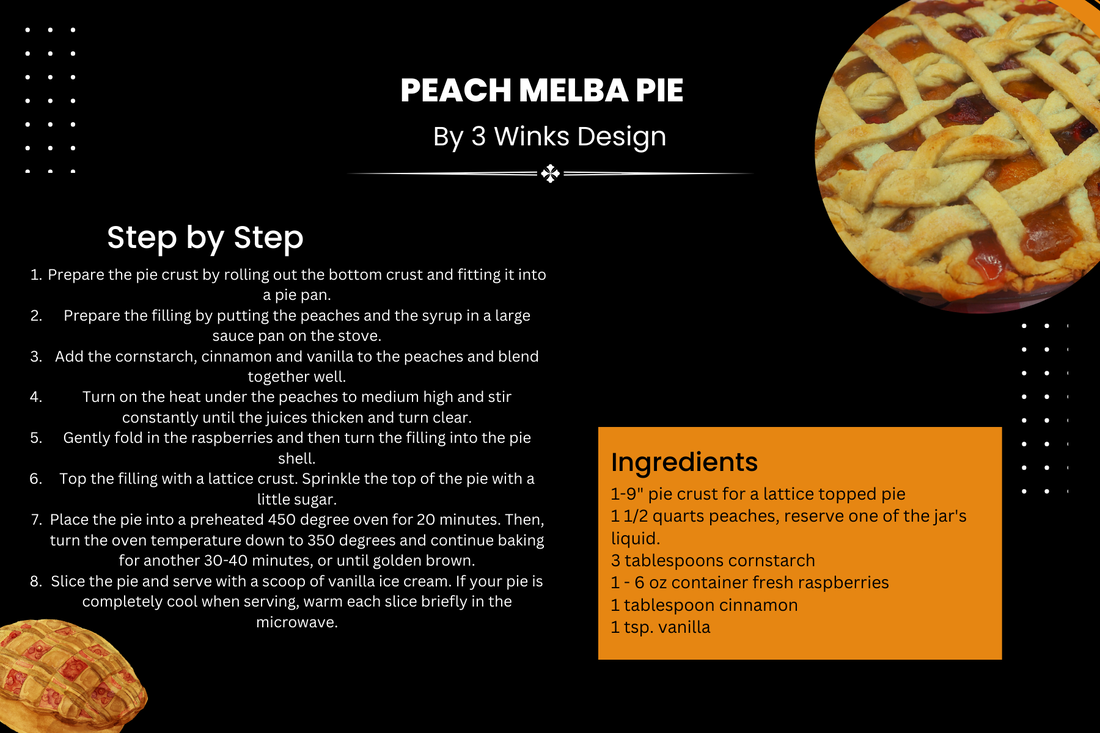
|
This post contains affiliate links. We will be compensated for any purchases you make at no additional cost to you. Thanks for your support!
I am not usually a huge raspberry fan. I prefer blackberries, as many of you know if you have followed us over the years. But, when raspberries go on sale for a fantastic price in the grocery store, you can't pass them up!
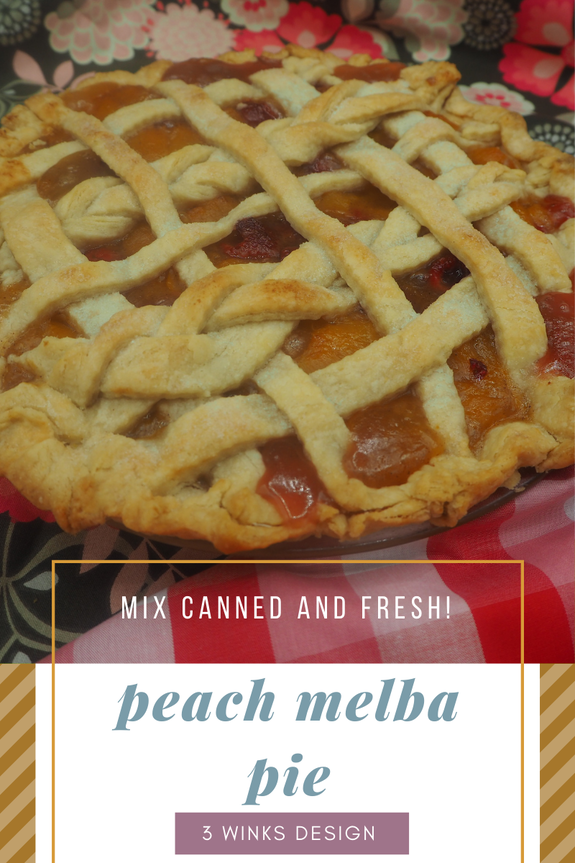
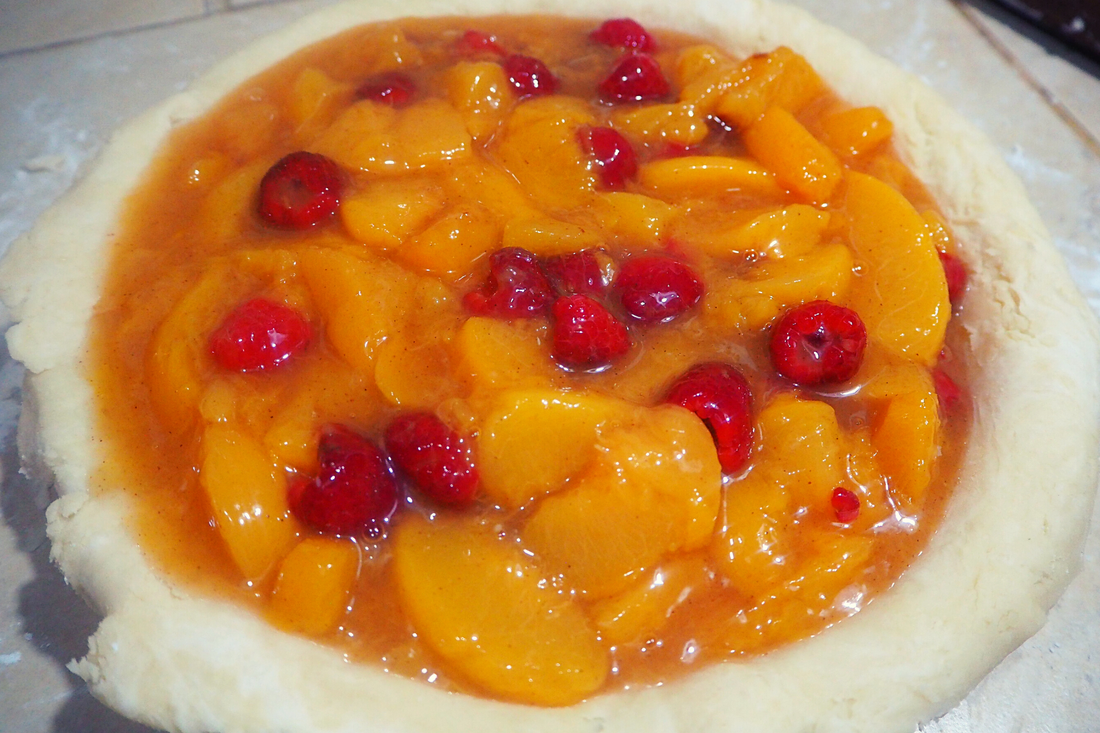
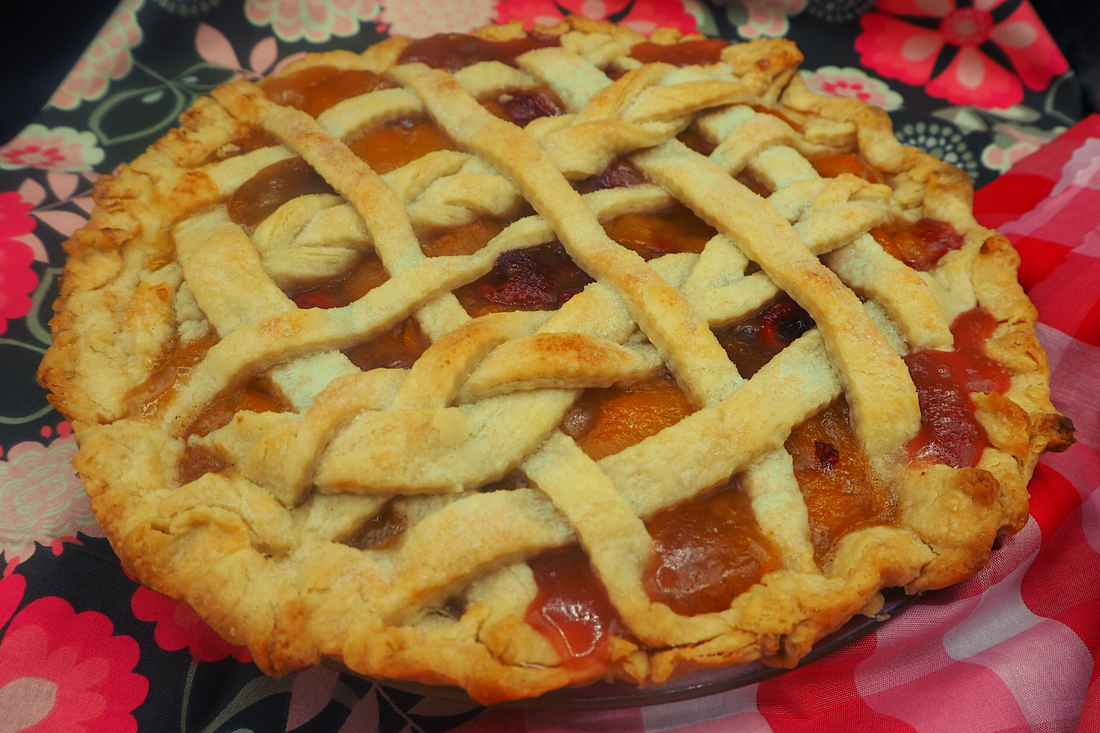
I've eaten in the Blue Bayou Restaurant at Disneyland exactly once in my life. It is pretty pricey and you have to make a reservation way in advance. Years ago, it wasn't quite so pricey or hard to get into and my husband and I didn't have children yet. On a trip with my sister and her husband and some friends, we took the splurge. The ambiance was amazing and the thing I remember most about my meal there was that for dessert I had Peach Melba! Peaches, vanilla ice cream, raspberry sauce with a few whole raspberries. It was simple and delicious. Ever since that memorable moment, when I think of raspberries, I think of Peach Melba. The problem I see with Peach Melba is that right now, when the raspberries were on sale, the peaches were not. Luckily, I have home canned peaches! Problem solved! But wait! Did you know that January 23rd is National Pie Day? (Seems weird, I know, after the holidays are over when we have just eaten a ton of pies.) So, the girls decided that I should come up with a new pie recipe to share with you in honor of National Pie Day. Can you guess what happens next? You're right! The idea for Peach Melba Pie popped into my head!
Come to find out, I'm not the first person to come up with this idea. Although, I don't recall seeing a recipe that contained a mixture of canned peaches and fresh raspberries. I mean, this is real life folks, we don't always have access to all of the fresh things all year long, especially if we are trying to be frugal. The best thing of all though is that this pie came out so good and I know it is something anyone can make! Here are a few tips before I share the entire recipe.
Don't forget the scoop of vanilla ice cream on top!
If you have already purchased our For the Love of Pie ebook from our Etsy Shop, you can print off this recipe and add it to the many pie recipes already contained in that thing! If you haven't purchased your copy yet, give yourself a gift for National Pie Day! You will be a pie expert by next Thanksgiving!

0 Comments
This post contains affiliate links. I will be compensated for purchases made through those links at no additional cost to you. Views expressed are my own. Thank you for your support!
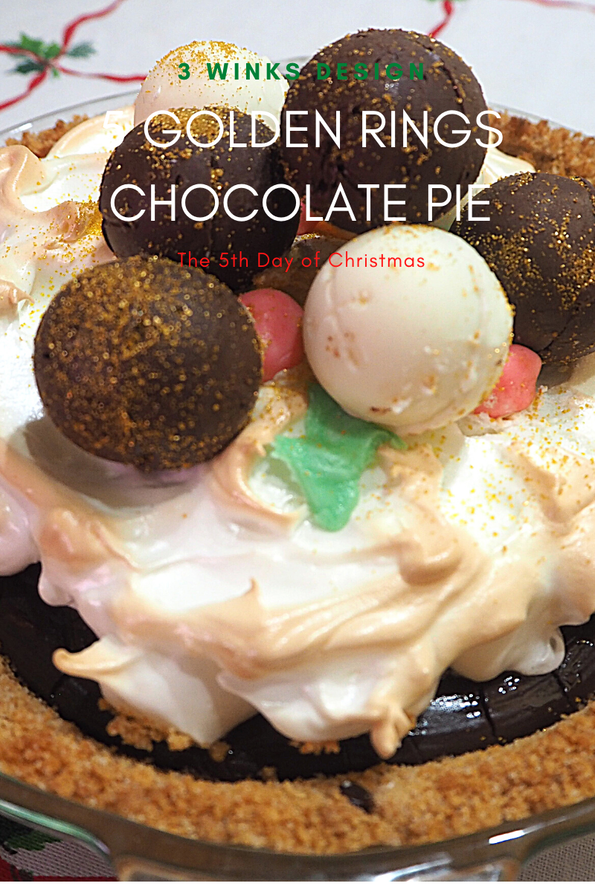
Have you watched the Holiday Baking Championship Show on HGTV? On one of the episodes, one of the contestants made chocolate jingle bells to decorate her dessert! I know I had to try it and when I got to do "5 Golden Rings" for our 12 Days of Christmas recipes, I knew that this was my chance! These bells don't ring exactly, but they DO shake, and when you break them open, lots of sprinkles pour out. They are a lot of fun!
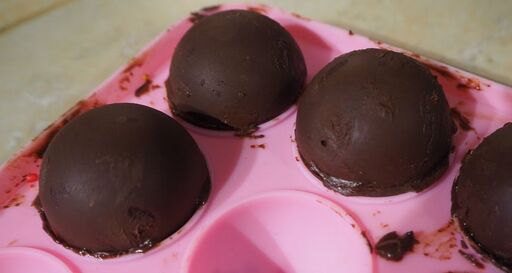
To make them, you start with a round silicone mold. You can order one on Amazon similar to mine or buy one at Michael's like I did.  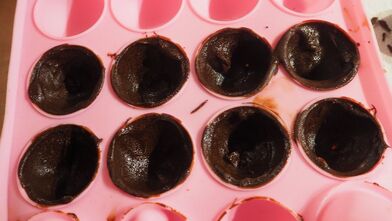
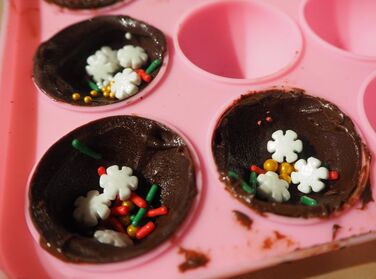
Use a spoon to make a shell inside the mold. Make sure there is a cavity to fill with sprinkles. Harden in the refrigerator.
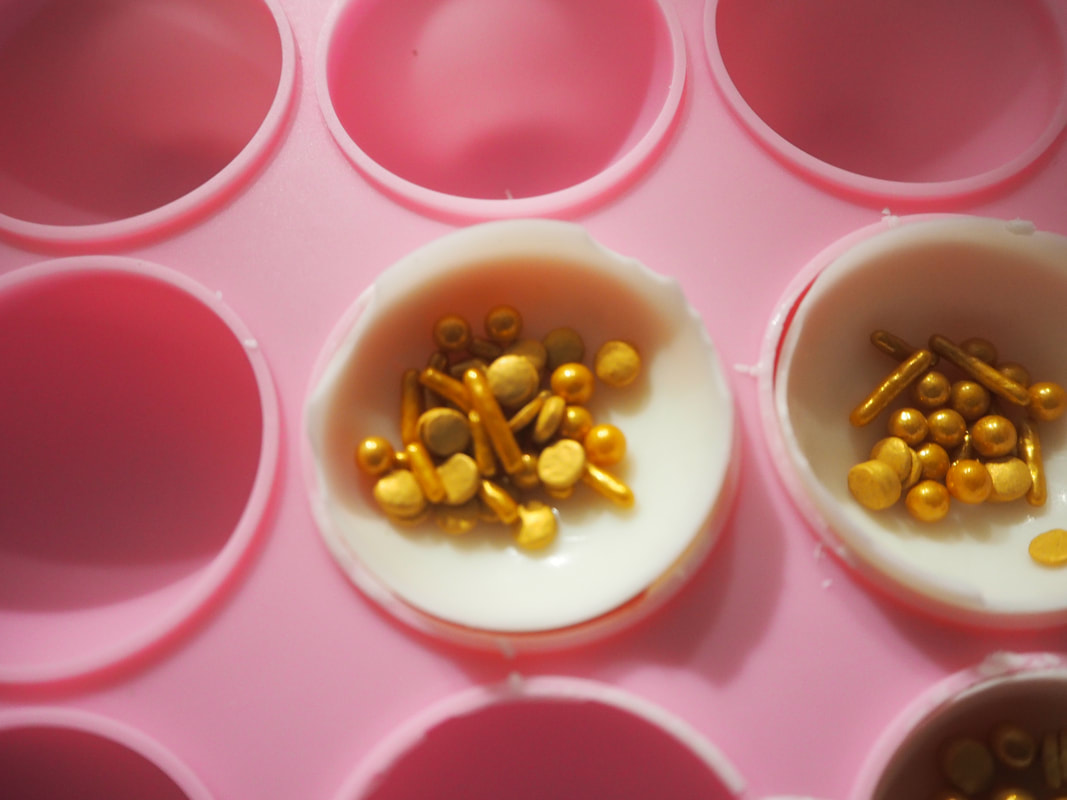
When they are hardened, pop them out of the molds and then put them back into the mold.
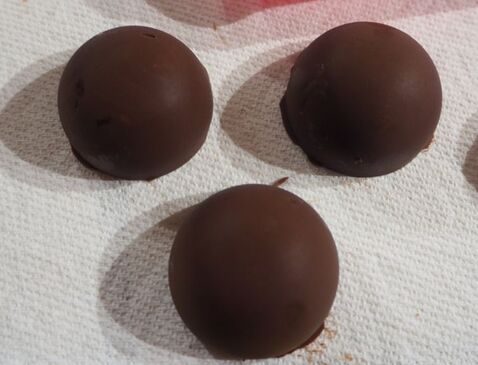
It is probably best to wear gloves to do this part. Have a warm pan ready that has a bit of your left over chocolate in it. Pick up an empty dome and rub the edge of it briefly in the chocolate of the warm pan. Place it on top of the dome filled with sprinkles like a lid to complete a sphere. Allow these to harden in the freezer.

When they are hardened, you can shake them! They are starting to look like jingle bells!
I used a metal skewer and heated the tip of it on my stove. I used it to make four holes and a criss-cross to make the jingle bell affect.
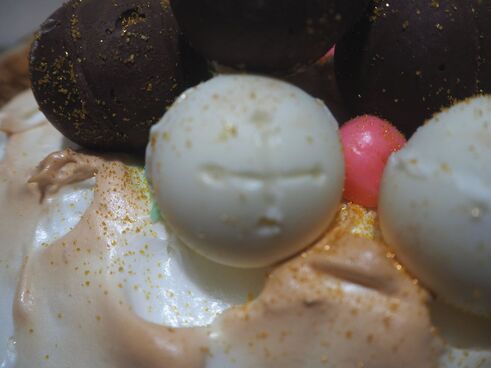
The bells for this pie had golden sprinkles inside of them to carry on the idea of "5 Golden Rings." I also sprinkled the outside of the bells with golden sanding sugar.
Of course, I had to have a delicious pie to put the bells on! Here is my recipe for Chocolate Cream pie. I used a graham cracker crust for this pie, but I kind of wish I had used a regular crust. The pie was still a hit though. You do what ever you prefer.
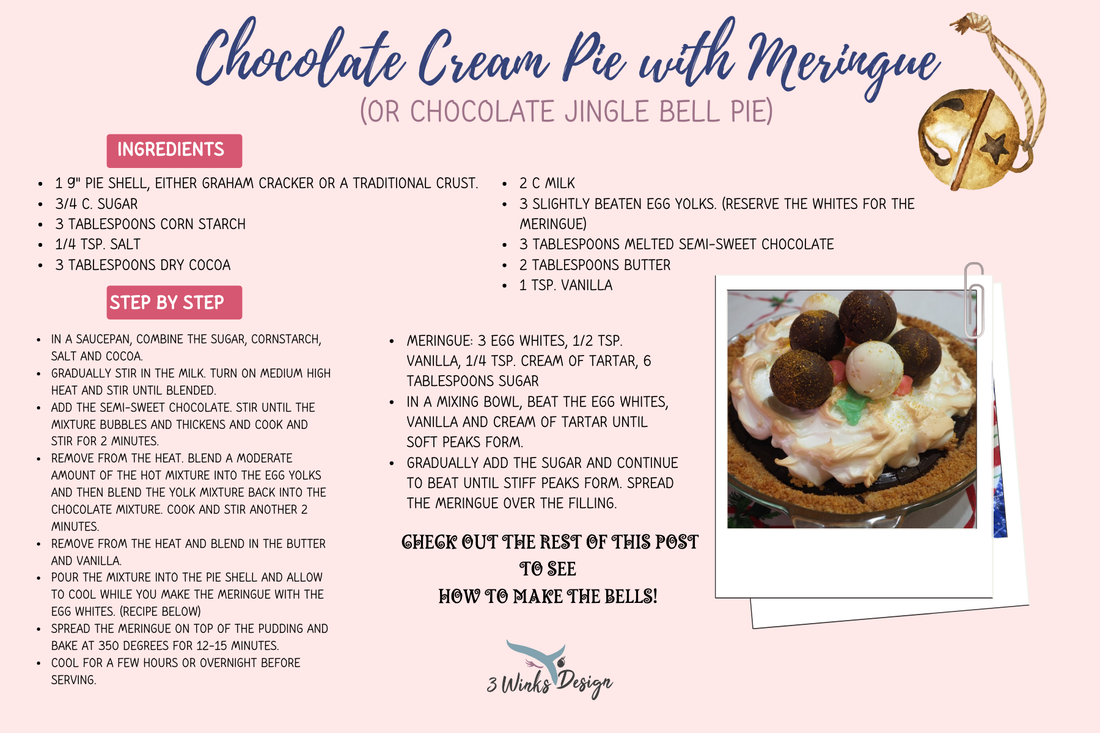
You can always make your pie using a chocolate pudding mix. (The cooked variety is best.) Making it from scratch is simple though. Since I made this one from scratch, I had egg whites left over, so I used them to make meringue rather that using whipped cream on this pie.
To decorate the pie, I piled on the meringue and toasted it in the oven. My first idea was to make a fondant ribbon using my homemade fondant. But, I ended up making holly berries and a couple of leaves. The fondant helped to hold the bells in place. 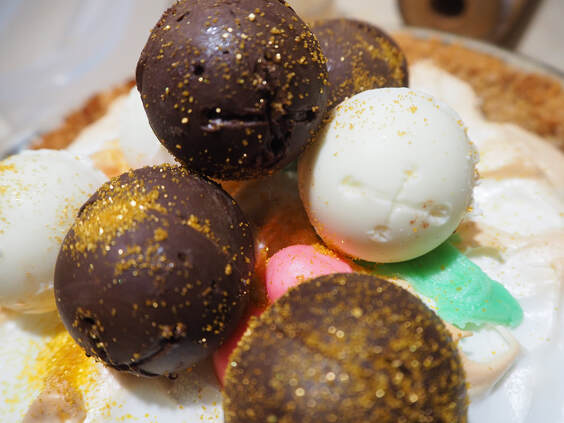
You can see the bell criss-crosses better here!
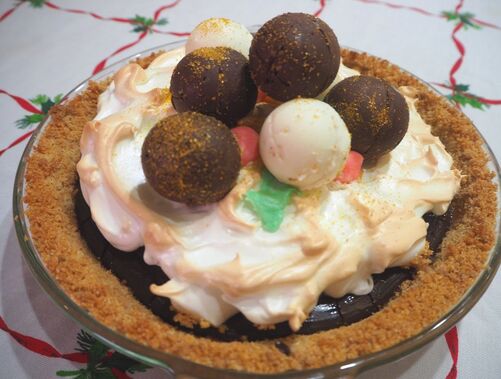
We had company over for dinner and they liked the pie so much that they took pictures of it before I cut into it! That is such a nice compliment!
I know that I put more than 5 bells on the pie! I wanted to be able to give everyone a bell when I sliced it! Then, they can hold it still with their fork and hit it with their knife and break it open. This is an interactive pie! Aren't those bells fun?
I think it would be fun to fill the bells with M&Ms or other small candies or how about a Lego guy? Just be careful no little ones choke on whatever you put inside! Another idea I've been toying with is making smaller versions of Hot Cocoa Bombs inside the small spheres. Hot Cocoa Bombs make a Large cup of cocoa! For little ones, a smaller version might be nice. So, a piece of pie and a cup of hot milk to drop a Jingle Bell Cocoa Bomb into could be so much fun! What ideas can you think of to use these Jingle Bells for? Let me know in the comments! If you have missed the first 4 days of Christmas, go to our Home Page and scroll through the first four days! There is already so much great food there! I can't wait for days 6-12!
This post contains affiliate links. I will be compensated for purchases made through those links at no additional cost to you. Thank you for your support!
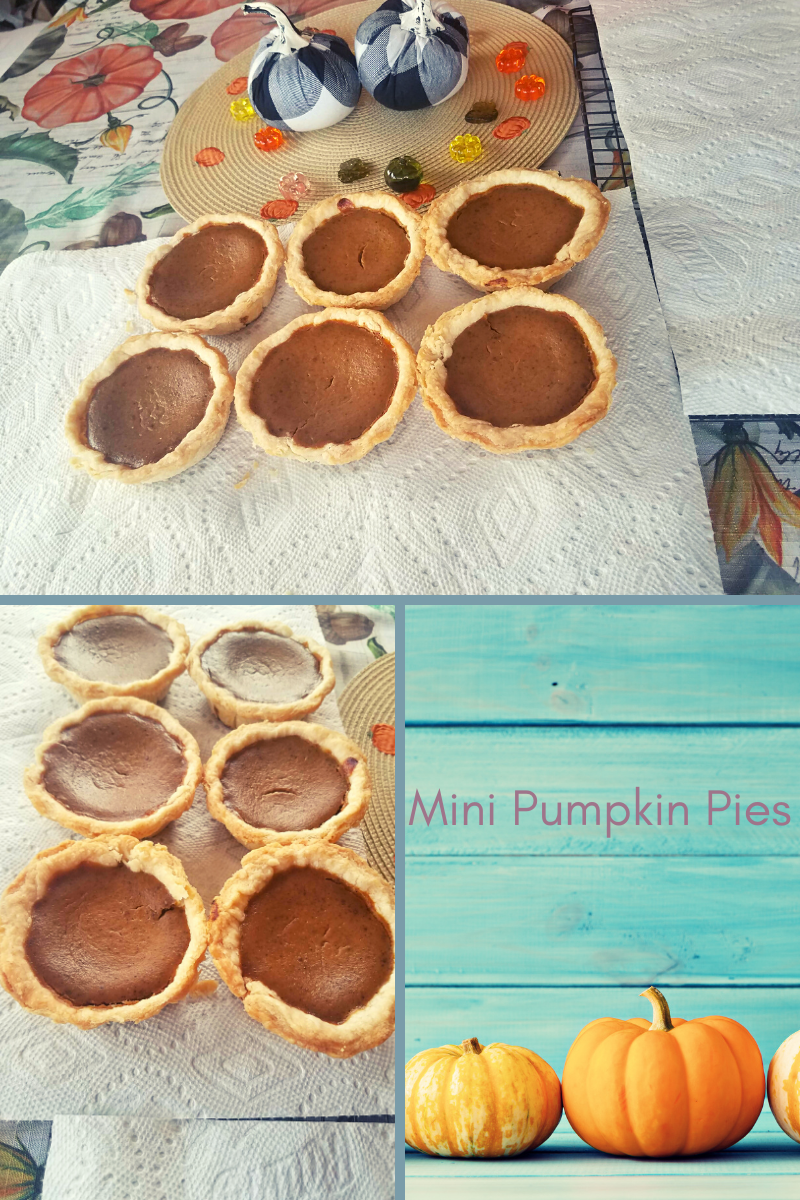
Lindsey here to tell you about these cute little pumpkin pies I made.
I think that if I could tell you the top two things we are known for the first would be the Original Hot Cocoa Bomb, which we created YEARS before Costco started selling their imitation. The second thing would be pie! This started off with my mom showing you how to make our basic pie crust. Since then we've only shown you some of the most amazing pies around: Like the best apple pie ever (I'm biased towards my mom's and don't really like anyone else's.) This award winning Dream Pie Alicia makes. (It is so creamy and DELICIOUS!) And of course, because I am me, my favorite pumpkin pie! We love pie so much we put some of our favorite and best recipes in a book, and are letting you have it! In our Etsy shop we still have our For the Love of Pie Book up for sale. With Thanksgiving swiftly approaching you're going to want this book for all of your pie needs! Well, since we love pie so much, when I saw this mini pie pan at a Pampered Chef party, I knew I just had to have it! 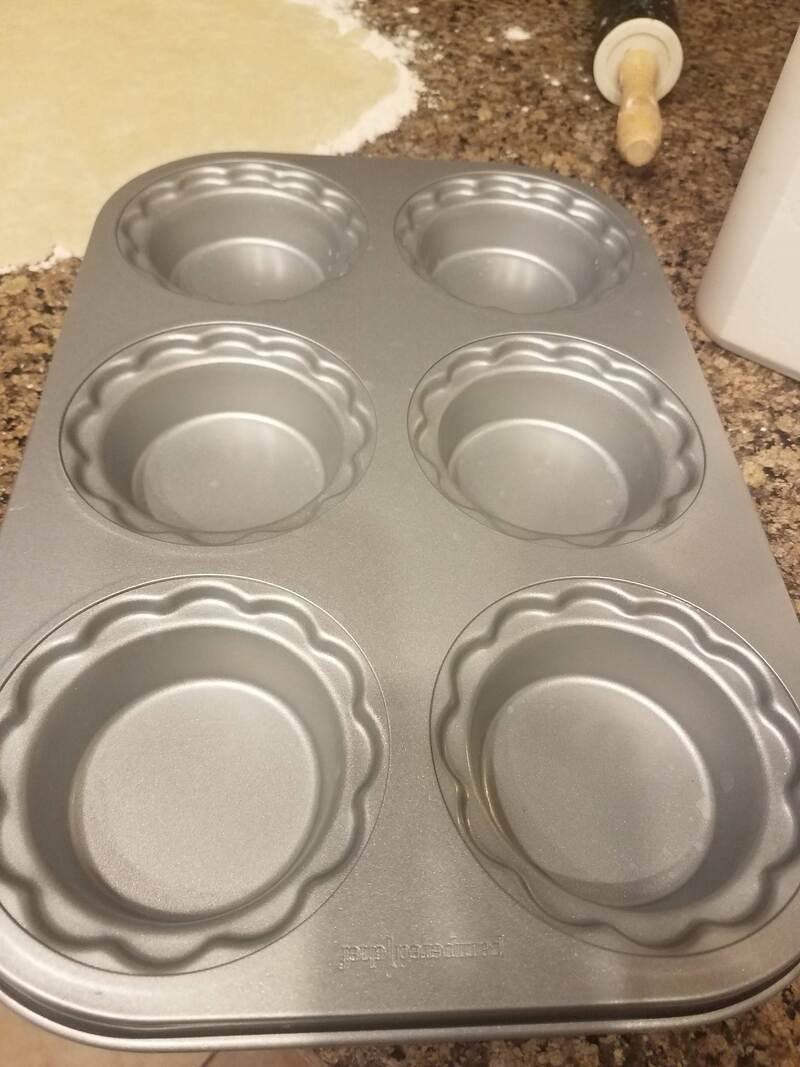
It was so cute! I bought it with these little pie cutter rings to make perfectly shaped mini pie crusts!
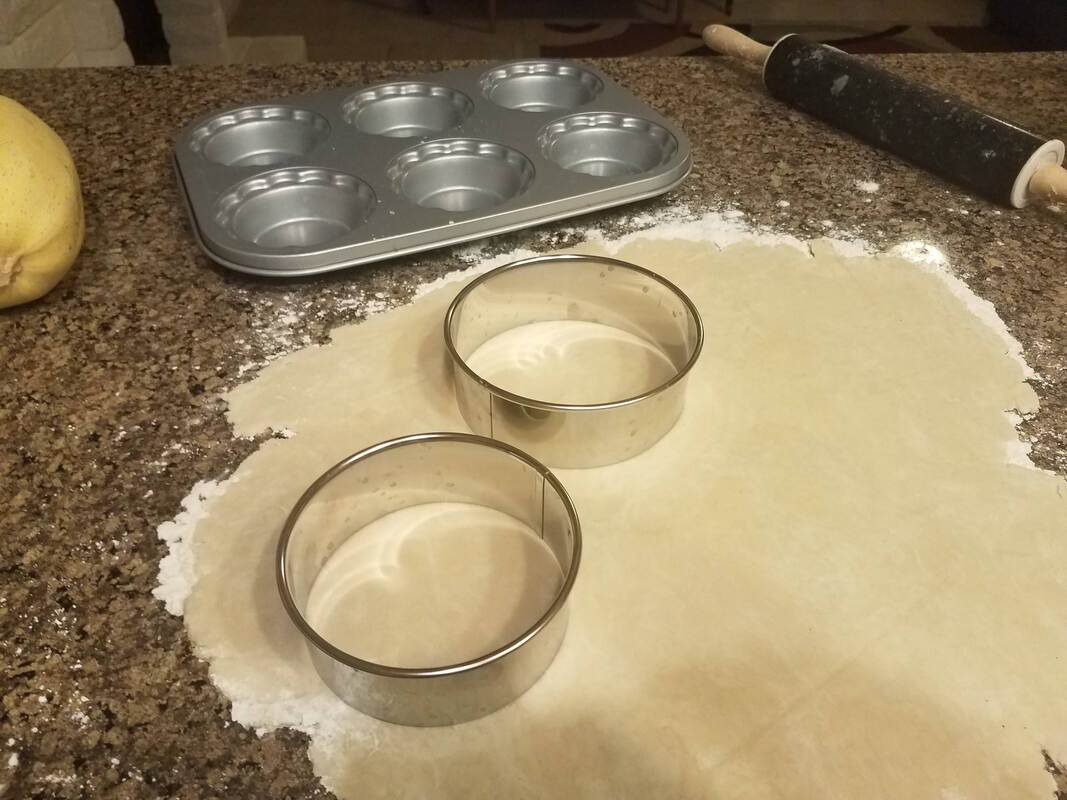
I found a few mini pie pans on Amazon for you to get your own. Like this mini pie pan! It makes twelve little pies, and comes with it's own cutting tools! Or you can get these cute individual mini pie plates. Don't you love the scalloped edges? So cute!
Once you have your mini pie pans or tins, you can make any type of mini pie that you want! You could make my mom's delicious pecan pie! Or get your For the Love of Pie e book and make all kinds of mini pies, and then put them together in a cute pie charcuterie board! Here is the pie charcuterie board my mom put together last year for my birthday party! I made mini pumpkin pies. I also bought little pie boxes to package them up! 
If you want to make these mini pumpkin pies, use my pumpkin pie recipe found in the For the Love of Pie book. I adjusted the baking times like this: 450 degrees for 7 minutes, then 350 degrees for 20 minutes. You could even spruce your little pies up with cute little leaf designs! My recipe made 12 mini pies! You could just make mini pies for Thanksgiving and have dessert be a pie charcuterie board! Everyone would get their own little pie! I can see now how beautiful that table would look! Hop on over to our Etsy shop to get yourself ready for Thanksgiving with our pie book and have fun with it! I think I'm going to go make some more mini pies, maybe this time a fruit pie!
This post contains affiliate links. I will be compensated for purchases made through those links at no additional cost to you. All views expressed are my own. Thank you for your support!

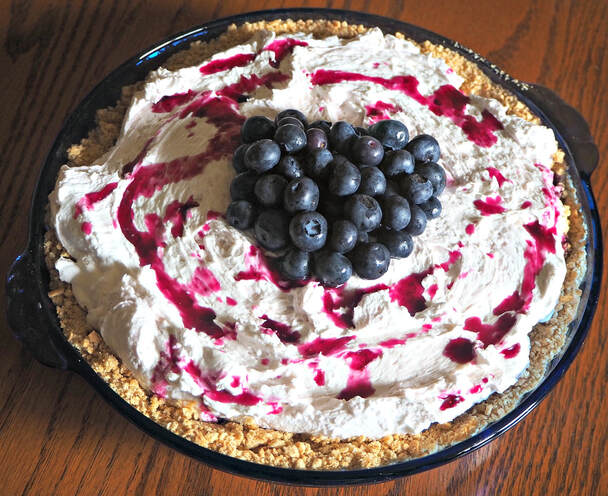
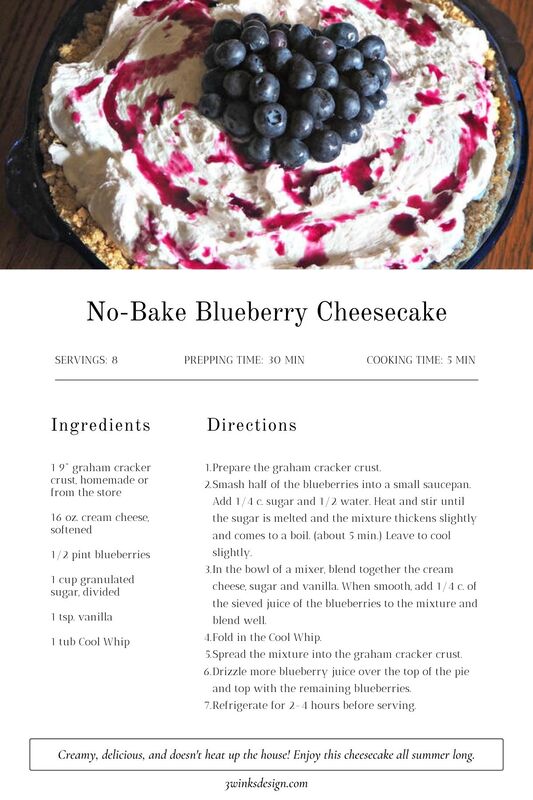
Blueberries have been on sale! Here is a luscious, creamy way to use them without heating up your kitchen. I didn't even turn on my oven to make the crust! I simply put together the graham crackers, sugar and melted butter, pressed them into my favorite blue pie dish and chilled it until I was ready to use it. (Blue pie dish=Perfect for blueberry desserts!) The blueberry flavor isn't super strong, so on this blueberry cheesecake I love to pile on the fresh blueberries to get that fresh taste.
Here is the recipe!
I hope you try it and love it! Let me know!
Here are a few other blue pie plates!
Here are more no-bake cheesecake recipes you may love:
|
Creators of Hot Cocoa Bombs! (copyrighted)

Author
Helen Reynolds: Mother of six children , grandmother to eleven! I love to cook, craft and create things and I especially love doing that with my family, So, when my lawyer daughter, Lindsey, my artist daughter, Madalynn, and I came up with the idea of Hot Cocoa Bombs, this blog was born. Then, one more daughter, with her technical and science skills, plus creativity has joined in to round us out! Read more about us here! 
Click this link and visit 3WinksDesignShop on Etsy. Find our Hot Cocoa Bomb Idea Book, our For the Love of PIe e-book and more of our creations!

Amazon Gift Cards are the Perfect Gift!
    Archives
April 2024
|

 RSS Feed